Automatic OCR processing and PDF text recognition is now a necessity in many situations. With built-in Optical Character Recognition (OCR) technology, DocuFreezer lets you recognize text from various documents, thus becoming a useful OCR conversion tool. So if you're looking for a solution on how to OCR a PDF in order to make it searchable, try our step-by-step instructions or keep reading the entire article.
- What is OCR
- Simple OCR converter for Windows
- How to convert to searchable PDF (or TXT)
- How to use Tesseract OCR as OCR engine
- How to use Adobe Acrobat as OCR engine
- Converting scanned image to text
- Converting bitmapped PDF to searchable PDF
- How to remove noise before OCRing
- Capture text from AutoCAD DWG and DXF
- Other solutions for OCR conversion
- 7 steps to improve OCR accuracy
 What is OCR
Optical character recognition (OCR) is a method of converting a scanned image into text. When a page is scanned, it is usually stored as a bitmapped JPEG or TIFF format. When the image is on the screen, we can read it. But to the computer, it is just a series of black and white dots. The computer does not recognize any “words” or actual characters in the image. DocuFreezer can help you turn a flat image into letters and characters.
Simple OCR converter for Windows
DocuFreezer can convert scanned images into editable text documents. The key benefit of this feature is the ability to extract text from images (or image-based documents) which can be copied and used somewhere else.

How to convert to searchable PDF (or TXT)
Do I need to enable OCR in DocuFreezer each time?
If your source files already contain text (e.g., Word documents), you don't need to turn on the OCR feature in DocuFreezer before converting them. The original text will be preserved by default.
If your source files do not have text that can be selected and copied (e.g., scanned images), enable the text recognition (OCR) feature before starting the batch conversion.
- Open DocuFreezer;
- Add files or an entire folder to the List of files;
- Select Output file type: PDF or TEXT;
- Go to Settings;
- Place a checkmark next to Make PDF searchable (OCR) or OCR (Optical Character Recognition);
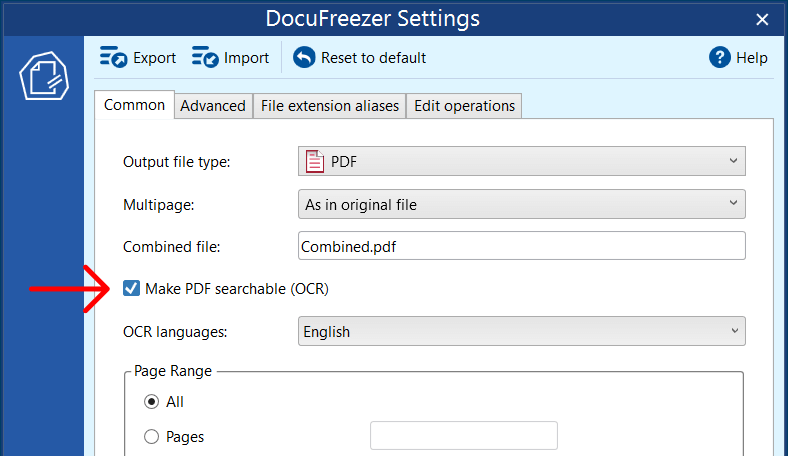
- Select the language of your input documents (better not select many languages at the same time);
- Select Multipage and other options if necessary;
- Click Start;
- Check the resulting files in the Output folder.
Please note that the text copied from an OCRed document may contain typos, errors, or random symbols. No OCR software is perfect, so it is necessary to proofread the produced text after OCRing. However, this process is still much faster than typing the entire document manually. If the text recognition is poor after conversion, you may need to change the source files’ quality or switch the OCR engine in DocuFreezer to Acrobat.
Input and output file formats
DocuFreezer allows you to convert PDF to text, scanned images – TIFF, PNG, JPEG to text, as well as CAD drawings, Excel files, and other data into editable text documents. The output files can be plain text files (TXT) or searchable PDF files.
OCR languages
So far, DocuFreezer supports the following OCR languages:
- English
- German
- Hebrew
- Polish
- Italian
- Dutch
- Japanese
- Russian
- Spanish
- Portuguese
- French
- Chinese Simplified
The number of languages may be increased in further versions of DocuFreezer. If you would like to have more languages added, please contact our support team.
How to use Tesseract OCR as OCR engine
DocuFreezer is using Tesseract OCR as OCR engine by default. It is considered one of the most accurate OCR engines currently available, so it should be a good option for most cases. To use it, just make sure it is selected next to the OCR engine setting in DocuFreezer’s Advanced Settings.

Learn more about Tesseract on the official site
How to use Adobe Acrobat as OCR engine
If you have Adobe Acrobat installed, you can try switching the OCR processor to Acrobat. You can try this option if you are not satisfied with the results from the default optical recognition engine.
Note: you must have Adobe Acrobat DC (Version 12 or higher) installed. The full version is needed, Acrobat Reader will not do.
To enable Acrobat as OCR component:
- Open DocuFreezer's Advanced settings;
- Set OCR engine to Acrobat;
- Check the Disabled helpers setting and ensure that Acrobat is unchecked;
- Click OK.
- Try converting your files again (with the option Make PDF searchable (OCR) enabled).

Converting scanned image to text
When you scan a document, it becomes an image. Afterward, you might need to get the text out of it. The text that you can edit with a word processing, spreadsheet, or an editing program. Use DocuFreezer for this task – just add images and let the software OCR your files. Once the OCR is done, text in searchable PDF documents can be selected, copied, and marked up.
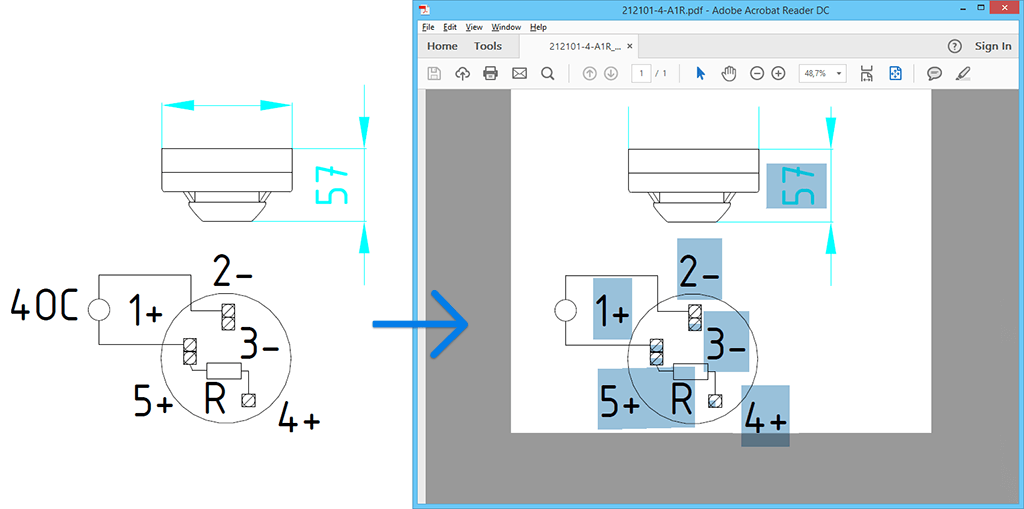
Converting bitmapped PDF to searchable PDF
You can also make your PDF searchable. DocuFreezer can create PDF containing editable text out of an image-only PDF or another filetype using the built-in OCR technology.
How to remove noise before OCRing
Source files, such as scanned documents, may contain unwanted elements or distortions. These may be small dots or specks caused by dust, paper texture, or poor scan quality. Such noise can prevent the OCR software from accurately identifying and converting text, which may result in errors.
To enable noise removal in DocuFreezer before OCR processing, open the Advanced settings and activate the OCR remove noise option.

Capture text from AutoCAD DWG and DXF
DocuFreezer supports DWG and DXF drawings as input formats. Thus, you can get the text out of your CAD drawings in the form of a searchable PDF or TXT. Simply follow the steps mentioned above: add the files to the list, select PDF or TXT as Output file type, go to Settings and check the option Make PDF searchable (OCR) or OCR (Optical Character Recognition).

Other solutions for OCR conversion
OCR files from the command line
If you prefer command line tools rather than desktop apps, try using 2PDF. It is a PDF converter with a built-in OCR module. So if you have, e.g., raster (bitmap) images or document scans such as TIFF, PNG, JPEG, you can create searchable PDF files from them – with just one command. As a result, you'll get PDF files with text that can be indexed and copied.
OCR files with hot folder software
Another tool to create searchable PDFs from scanned images and other documents is FolderMill. FolderMill enables users to monitor and automatically process incoming documents, such as PDFs, Microsoft Office documents, images and more. It allows users to set up document conversion processes, such as converting incoming documents to PDF or image format, printing them, or sending them to an FTP server or email box.
FolderMill can also be used as an OCR application to make output PDFs searchable.
7 steps to improve OCR accuracy
Text may be incorrect or corrupted after conversion with OCR. Short advice here is to make sure that the input files have high quality – large format and high resolution. Understanding the limitations of the OCR process can help you assist the OCR engine in producing more accurate results. The OCR results are considered to be good if the recognized text is 98-99% accurate (1-2% of OCR incorrect).
Below are some tips which will help you achieve better OCR results.
#1 Improve the quality of the source images
One of the most significant factors is DPI (Dots per Inch). Scan documents at 300 or higher DPI. Preferably, scan at 600 DPI to capture as much image information as possible. With high image resolution, OCR engine should be able to recognize high contrasts, character borders, pixel noise, and aligned characters.
#2 Select a lossless output format when scanning
To let OCR software extract text more precisely, choose a lossless file format, e.g., TIFF. If you scan to a TIFF without compression, no image information (roughly speaking, pixels) will be lost. Therefore, select a lossless file format, such as TIFF or high-quality PDF when scanning the source file.
#3 Enhance the contrast of images
Contrast and density are vital factors to consider before OCR'ing an image. When using a scanner (or an image editor if there is no way to scan the document again), you can adjust gamma and contrast to get clearer outputs. Adjust high contrast in such a way that characters are distinctive.
#4 Increase the text size of the source images
The recommended text size in the scanned documents is 10 points or higher. For the best results, try to make sure the text height is at least 20 pixels.
There is a minimum text size for reasonable accuracy. Consider the resolution as well as point size – OCR accuracy drops off below 10pt, rapidly below 8pt (with resolutions 300 DPI). At 10pt and 300 DPI, x-heights are typically about 20 pixels. Below an x-height of 10 pixels, you have very little chance of accurate results, and below 8 pixels letters will be "noise removed".
A quick check is to count the pixels of the x-height of your characters (x-height is the height of the lower case height). You can do it using a screenshot saving tool (e.g., Lightshot) or an image editor such as Photoshop.
#5 Select only those languages that are contained in your documents
If the OCR software you're using has an option to select between languages (like DocuFreezer), select only those which are in your source documents. The fewer languages selected – the better. This will help to avoid misinterpretation of characters.
#6 Avoid text rotation or skew and make text lines horizontal
When a page has been scanned when not straight, it can make the text rotated. If the text of a page is too skewed or rotated, it severely impacts the quality of the OCR. To solve this issue, try scanning a document again so that the word lines are horizontal. Alternatively, slightly rotate the digital image using an image editor.
#7 Remove dark borders and other objects near characters
Scanned pages may have dark edges around them. These can be processed as extra characters, especially if they vary in shape and gradation. If there's too much noise or objects, you can enhance the image using GIMP. Enlarge the image 2,5 times; then select background near letters using the Magic Wand tool and delete it; sharpen the image using Unsharp mark filter.
It is often impossible to comply with all these conditions, and proofreading may be required. You can use a grammar/spellchecker, such as Grammarly. Always proofread and correct any errors before sharing OCR-produced text. If none of the above helps, try switching to the Acrobat OCR processor or contact us for support.

You may also like to read:
Convert Images, Scans, and Other Files to Searchable PDFs via OCR with FolderMill