
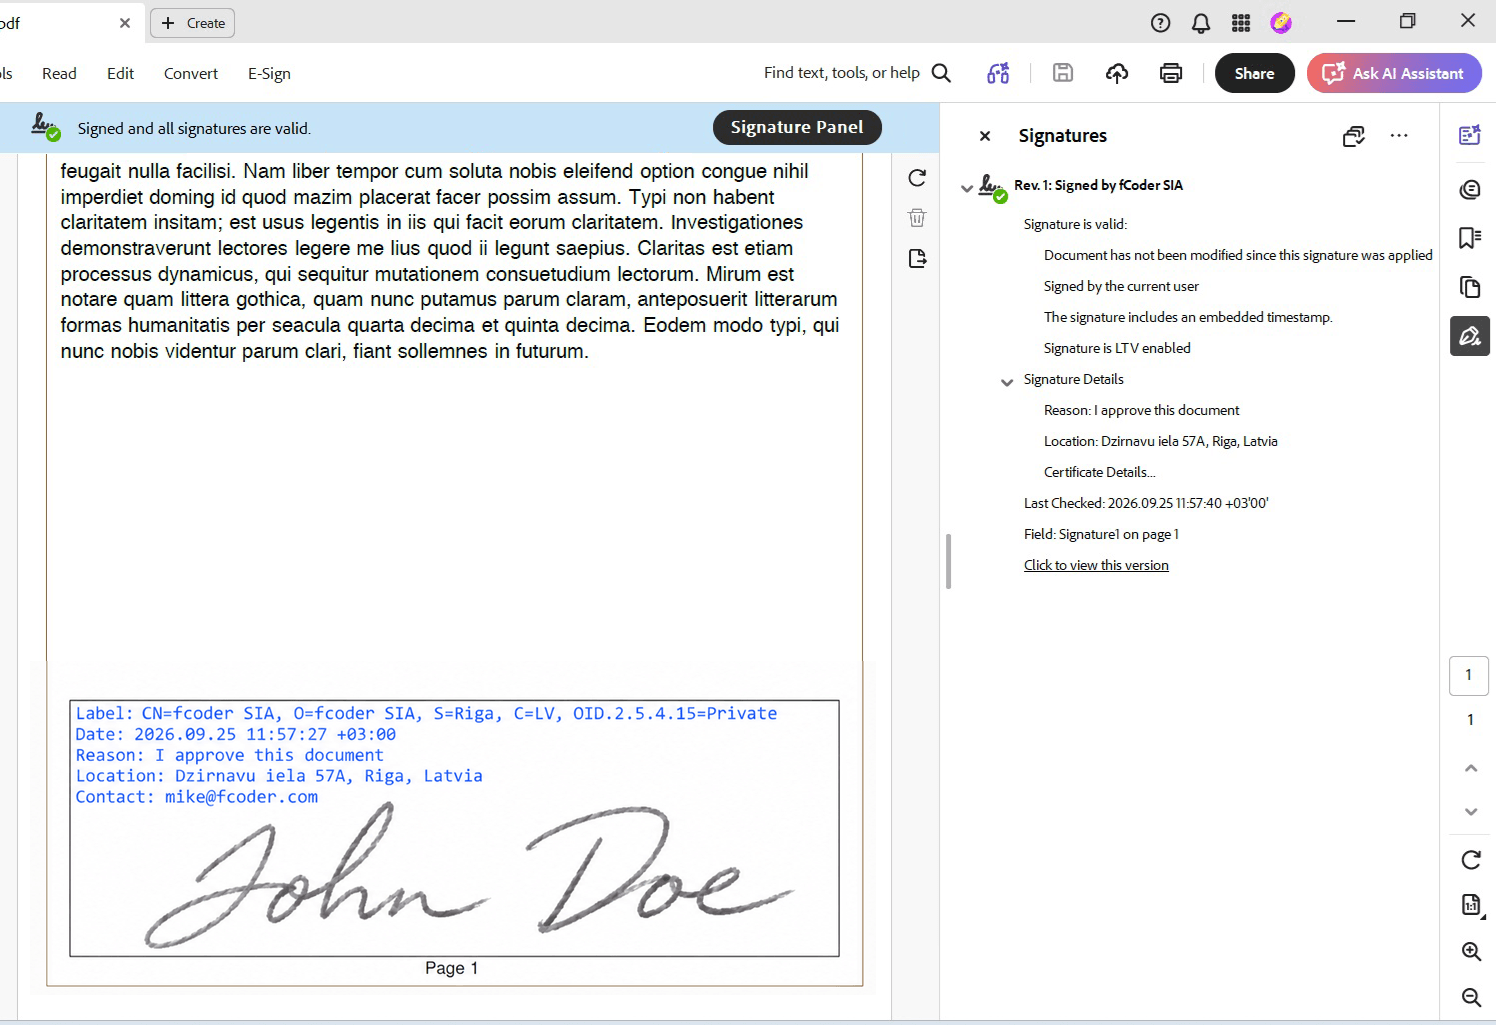
DocuFreezer can digitally sign multiple PDF files after conversion using a certificate file or a certificate from the Windows certificate store. A digital signature links the document to the signing certificate and helps detect changes made after signing. Recipients can check the signature in a PDF viewer that supports digital signatures, such as Adobe Acrobat.
Before you start
Make sure that:
- PDF is selected as the output file type in the Settings.
- You have a signing certificate that includes its private key.
- You can access that certificate either as a certificate file or through the Windows certificate store.
Keep the certificate file and its password secure. Anyone who can access both may be able to create signatures with that certificate.
Note: A digitally signed PDF is not automatically trusted by every recipient. Whether a viewer trusts the signature depends on the certificate chain and the recipient's PDF viewer settings.
Step #1: Add a PDF signing operation
- In DocuFreezer, click Settings and open the PDF signing tab.
- Click Add new.
- In the Sign selected pages row, click Select signing certificate to configure the operation.
- Select the new operation in the list to configure it.
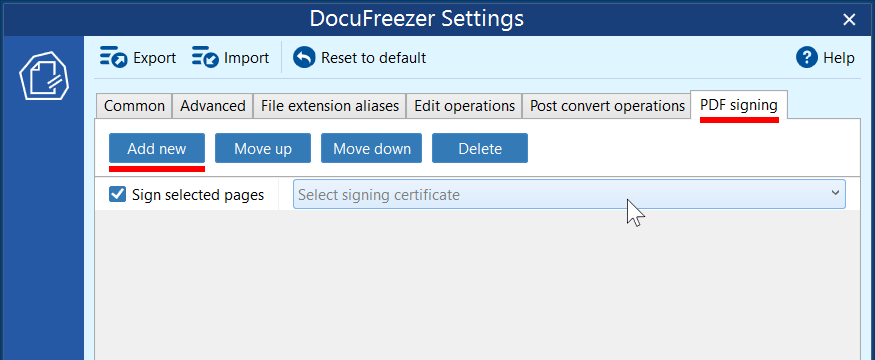
You can use Move up, Move down, and Delete to manage the signing operations in the list. You can add several operations here, and they will be applied from top to bottom.
Step #2: Choose a certificate
Open the Certificate subtab and choose a certificate source.
| Certificate source | Use it when | What to enter or select |
|---|---|---|
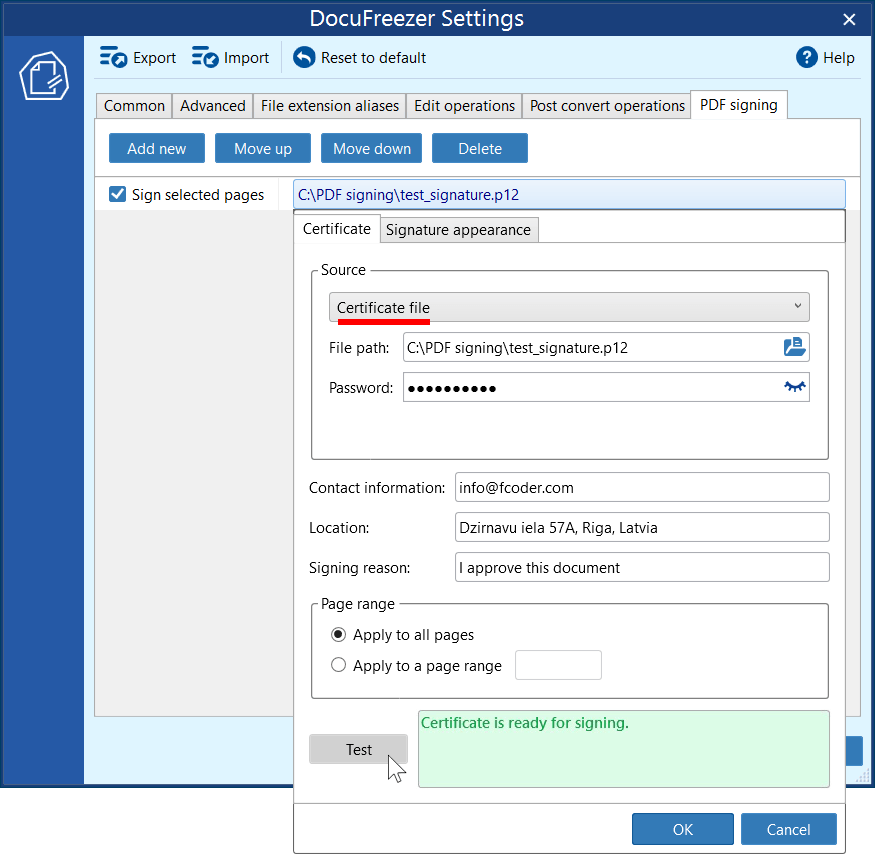
| Certificate file | The signing certificate is stored as a file. | Browse to the certificate file containing the private key and enter its password. |
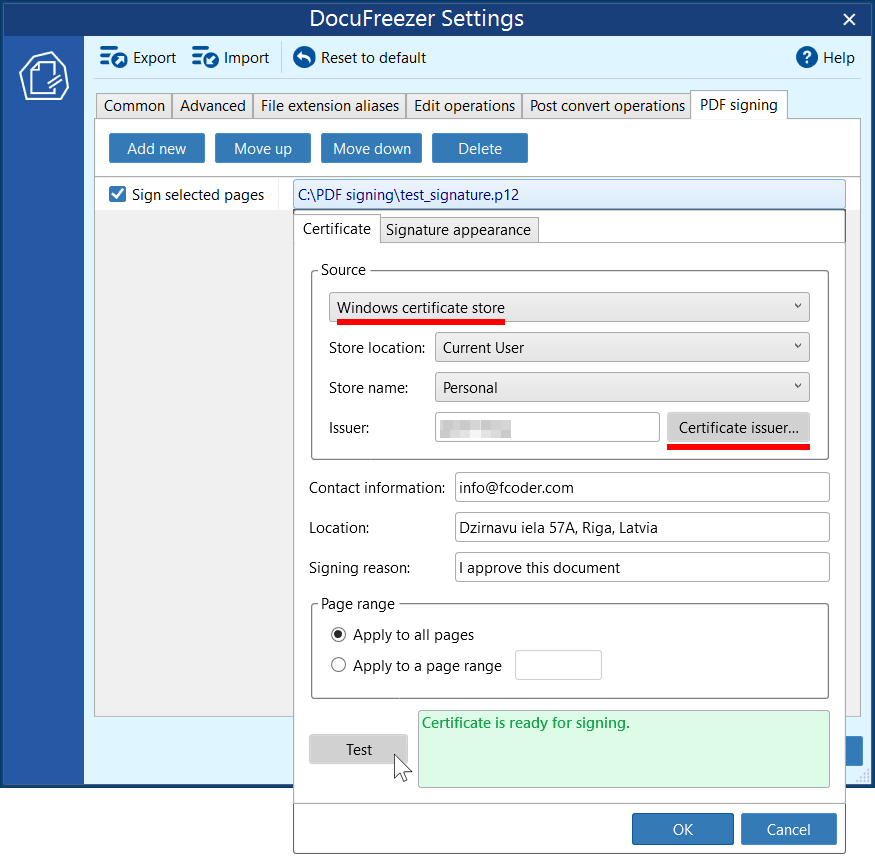
| Windows certificate store | The certificate has already been installed in Windows. | Select the certificate store location and name, then choose the certificate in Certificate issuer… |
Using a certificate file
DocuFreezer supports certificate files in P12 (.p12) and PFX (.pfx) formats.
- Select Certificate file as the source.
- Next to File path, browse to the certificate file.
- Enter the password for that certificate file.
- Click Test to check that the certificate is ready for signing.
Using a certificate from the Windows certificate store
- Select Windows certificate store as the source.
- Choose the required Store location and Store name.
- Click Certificate issuer… and select the certificate from the list.
- Click Test to check that the certificate is ready for use.
If the certificate is not available in the list, check that it is installed for the Windows user who runs DocuFreezer and that the user can access its private key. Your IT administrator or certificate provider can help with certificate installation and permissions.
Setting signature details and page range
The Contact information, Location, and Signing reason fields let you add information to the signature. For example, you can enter an email address in Contact information and a short business purpose in Signing reason.
Under Page range, choose one of the following options:
- Apply to all pages to apply the signature operation throughout the output PDF.
- Apply to a page range to enter only the pages or ranges that need it. Use commas to separate individual pages and ranges, for example: 1,3,5-10.
Step #3: Customize the visible signature appearance
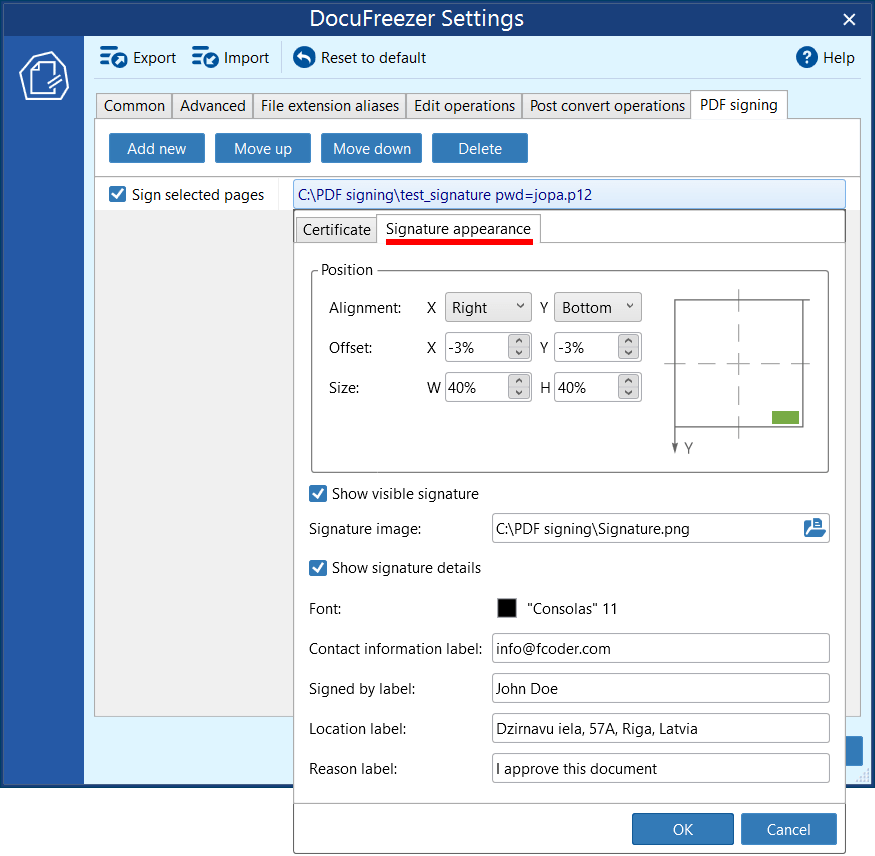
Open the Signature appearance subtab to control how the signature looks on the page.
- Enable Show visible signature if recipients should see a signature block in the PDF.
- Optionally select a Signature image.
- Use horizontal and vertical alignment (Alignment (X), Alignment (Y)) to place the block, then adjust its offset and width and height.
- Enable Show signature details to include text details in the visible signature block. Choose a font and customize the text labels below.
- Click OK to save the operation.
These settings are optional. Use them to customize the visible signature on the page. Enable Show signature details to display the text specified below in the output PDF, or disable it to hide that text.
Step #4: Process and verify the signed PDF
- Click OK to save the settings.
- Add files to the List of Files and start conversion with PDF selected as the output file type.
- Open one output file in a PDF viewer that supports digital-signature validation.
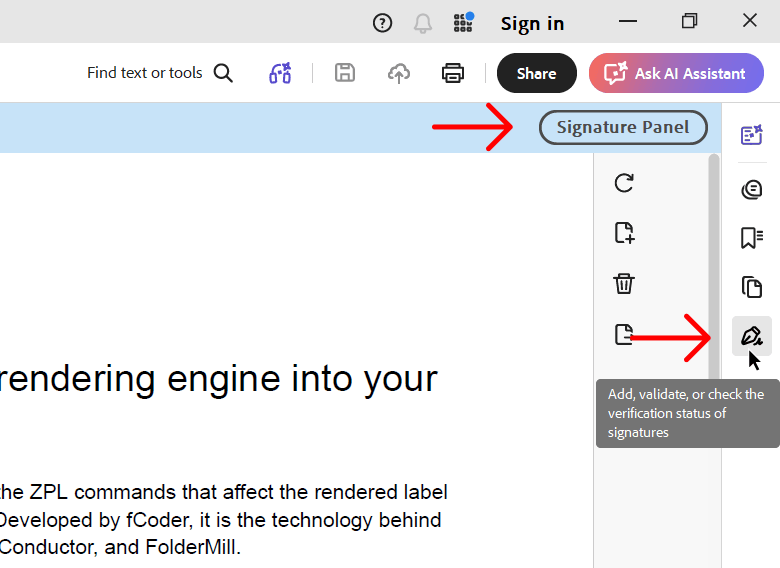
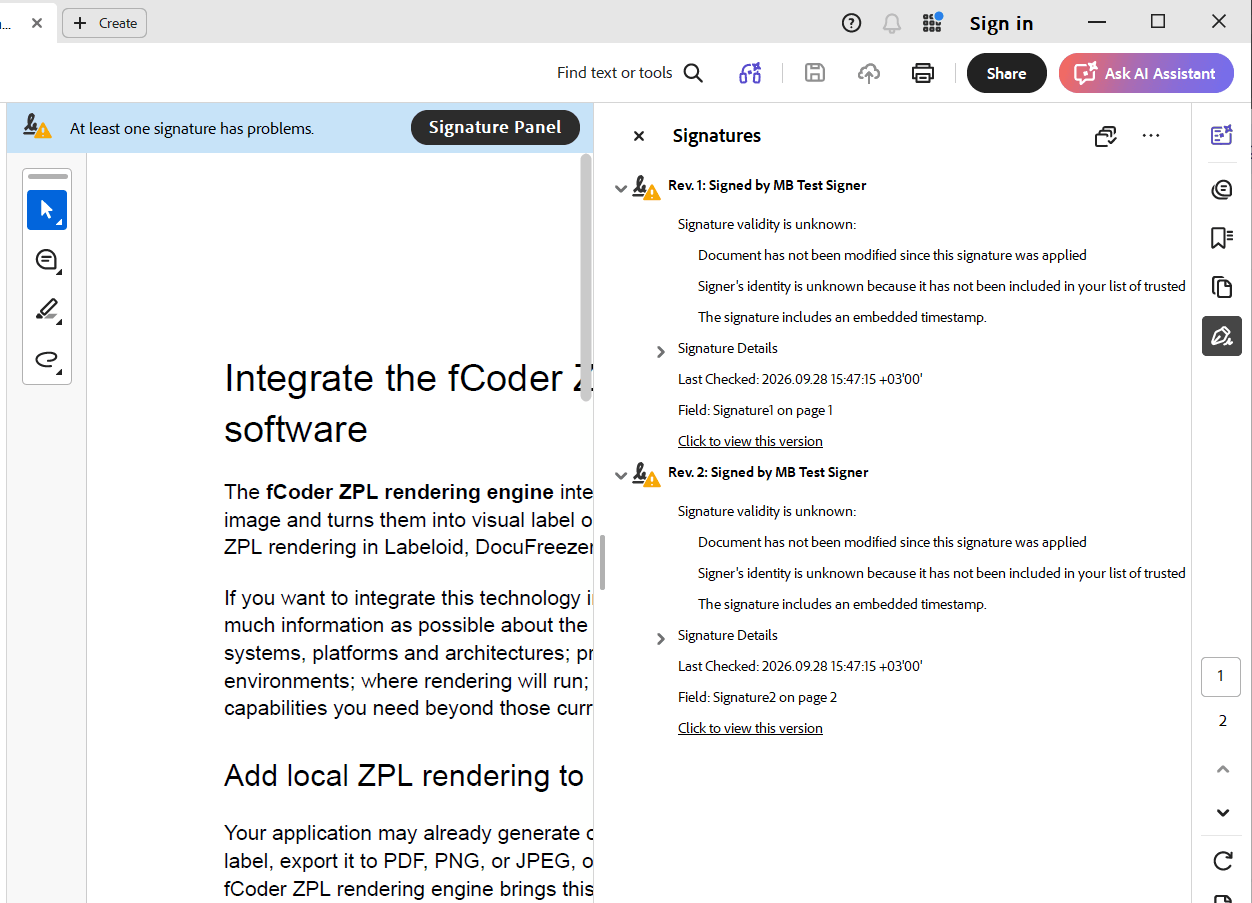
- Open a signed output PDF in Adobe Acrobat and click Signature Panel. Expand a signature to check its status, signer information, and certificate details.
Run a small test batch before processing production documents. This lets you confirm that the intended certificate is selected, the visual appearance is placed correctly, and the recipient's PDF viewer recognizes the signature as expected.
Troubleshooting
The certificate file path is invalid
Check that the Certificate file source is selected and that the File path points to an existing certificate file. Browse to the file instead of typing the path when possible.
The certificate is not available in the Windows certificate store
Select the correct certificate store location and store. If the certificate is installed for another Windows account, it may not be visible to the user who runs DocuFreezer. Confirm that the certificate includes an accessible private key.
The signature is shown as untrusted
A signature can be technically valid while the recipient's viewer does not trust the issuing certificate authority. Ask the recipient's IT administrator or certificate provider how the certificate chain should be trusted in that environment.
The signature becomes invalid after the PDF is changed
Changing a signed PDF can invalidate its signature. Make the necessary edits before conversion and signing, then distribute the signed output file without further modification.