Discover our DocuFreezer Tips & Tricks guide, designed to help you work faster and simplify your document conversion tasks. This resource unveils hidden features you might not know about. Stay tuned — more tips will be added in the future to keep boosting your productivity!
On this page
- How to merge multiple EML or MSG email files into a PDF and create bookmarks named after source files?
- There are watermarks at the bottom of document pages that are not needed. Is there a way to remove them?
- How to take date and time from the moment when DocuFreezer saved the output PDF file and add it to the output filename?
- A folder of PDFs that have various page sizes. How to convert them all to standard Letter size?
- My output files' EXIF metadata is missing. Is it possible to save or remove file metadata?
- A file can't be opened in CorelDraw after conversion by DocuFreezer ("The file is corrupted" error)
- Preparing documents to be printed in the correct order (without other print jobs in between)
1. How to merge multiple EML or MSG email files into a PDF and create bookmarks named after source files?
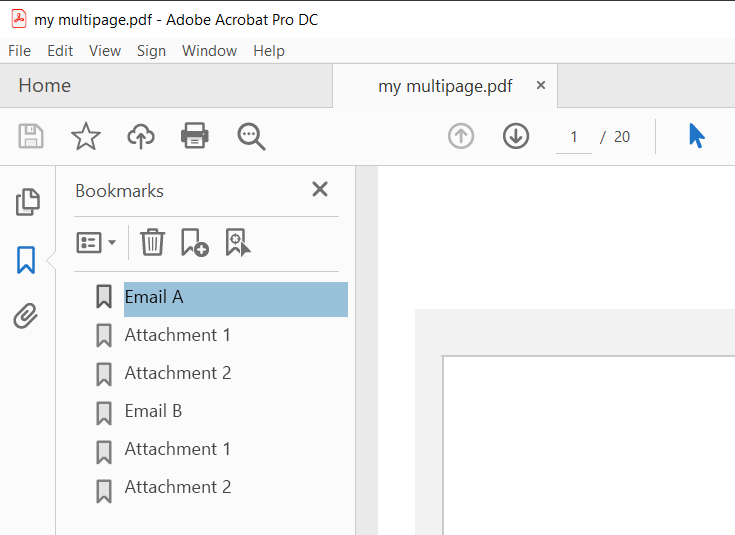
Q: When converting to a multipage PDF, can the software create bookmarks using file names so we can identify the source of each PDF page?
A: Yes, you can create a PDF with bookmarks that match the names of your input files.
- Go to Settings → Advanced → Attachments and set Convert attachments: Combine (attachments after main doc)
- Set Output formats → PDF → New bookmark title template value to {*SrcFileName}
For example, if an email has two attached files — sample1.pdf (one page) and sample2.xls (three pages) — the resulting PDF will contain: page 1 (email body), page 2 (sample1.pdf), and pages 3-5 (sample2.xls) and bookmarks with the same filenames.
2. There are watermarks at the bottom of document pages that are not needed. Is there a way to remove them?
Q: I want to remove the Bates tag at the bottom of each page.
A: You can remove existing watermarks, Bates tags, page numbers, or other document data during conversion by either adding a covering image watermark or cropping the pages.
Solution 1
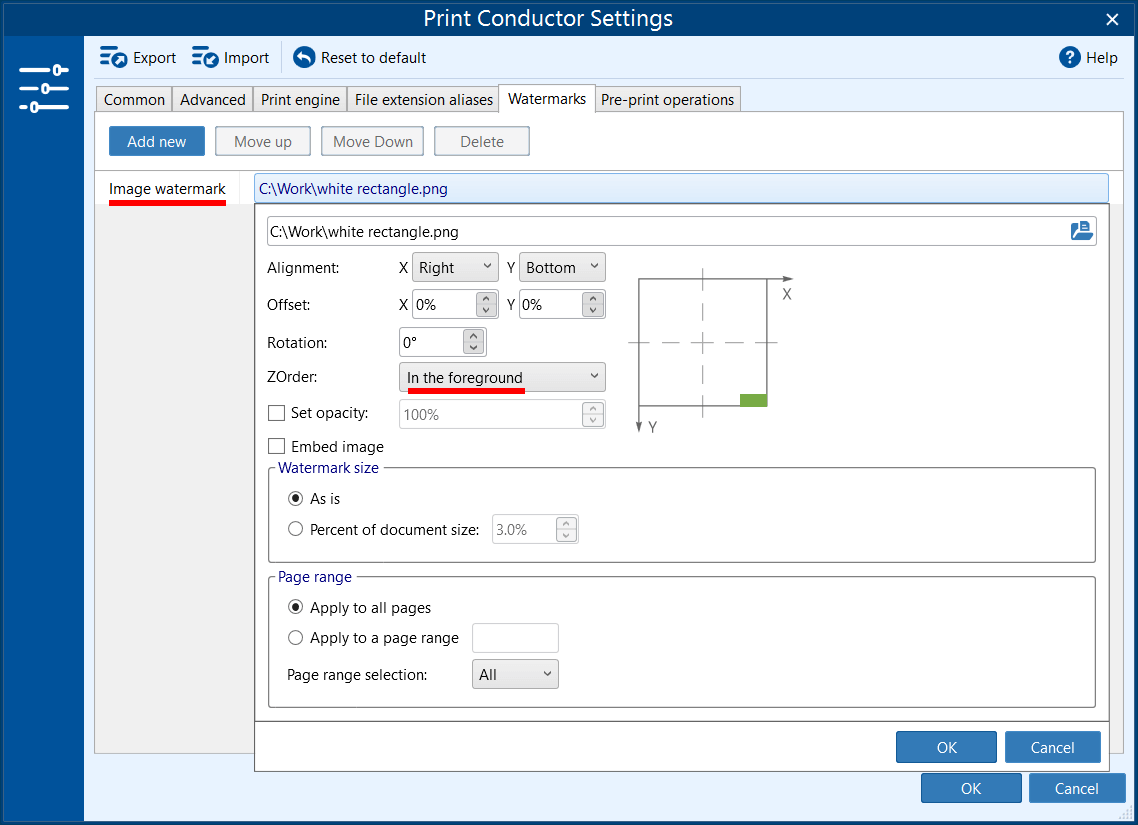
If your document pages have white margins, try placing a white rectangular shape on top. Create a simple JPG, PNG, or BMP image in MS Paint and use it as an Image watermark in DocuFreezer. Ensure correct positioning — the watermark default position, which can be changed, is to the bottom-right corner and it should appear on top of the page (Z-Order: In the foreground).
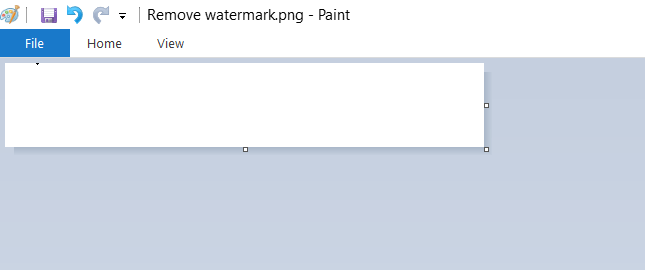
You can simply create a white BMP, JPG, or PNG image in Paint and use it for this purpose. If your document is not completely white, you can try a different color.
Solution 2
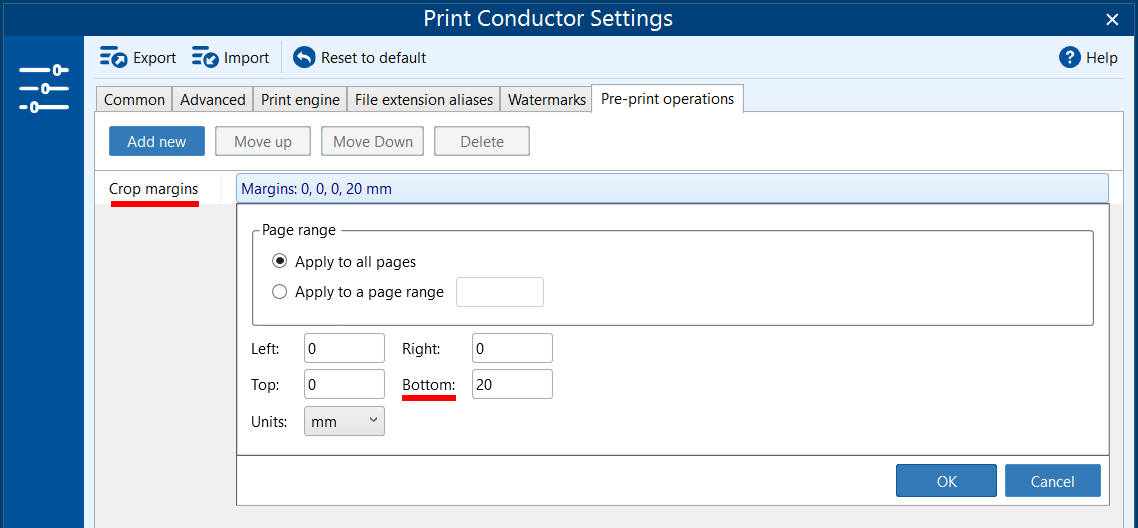
If a white rectangle isn't suitable (for example, if it's too noticeable), try cropping the pages to remove unwanted watermarks. Add a Pre-print operation → Crop margins and set the margins you want to remove. Setting the Bottom value will remove the lower portion of the page.
3. How to take date and time from the moment when DocuFreezer saved the output PDF file and add it to the output filename?
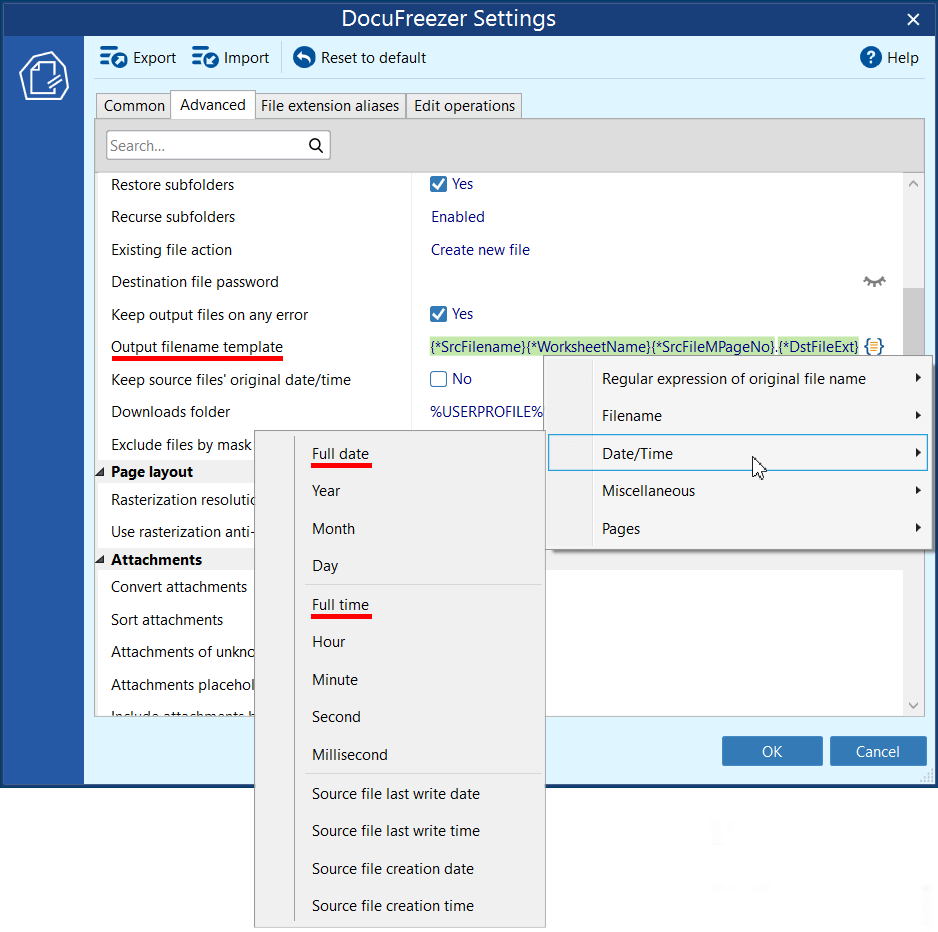
Q: I'd like to add a timestamp indicating when a file was converted by DocuFreezer. These date and time should be taken from the moment when DocuFreezer saved the output PDF file with format: MM/DD/YYYY HH:MM:SS
A: You can add the source file write/create date and time by using these these macros:
- Full date
- Full time
4. A folder of PDFs that have various page sizes. How to convert them all to standard Letter size?
Q: I have a folder of PDFs, varying page sizes, and want to convert all to standard Letter size. How can I do this?
A: You can convert all PDFs from a folder to a unified standard size by using the Resize operation. For Letter format, make the following settings:
- Width: 215.9
- Height: 279.4
- Units: mm
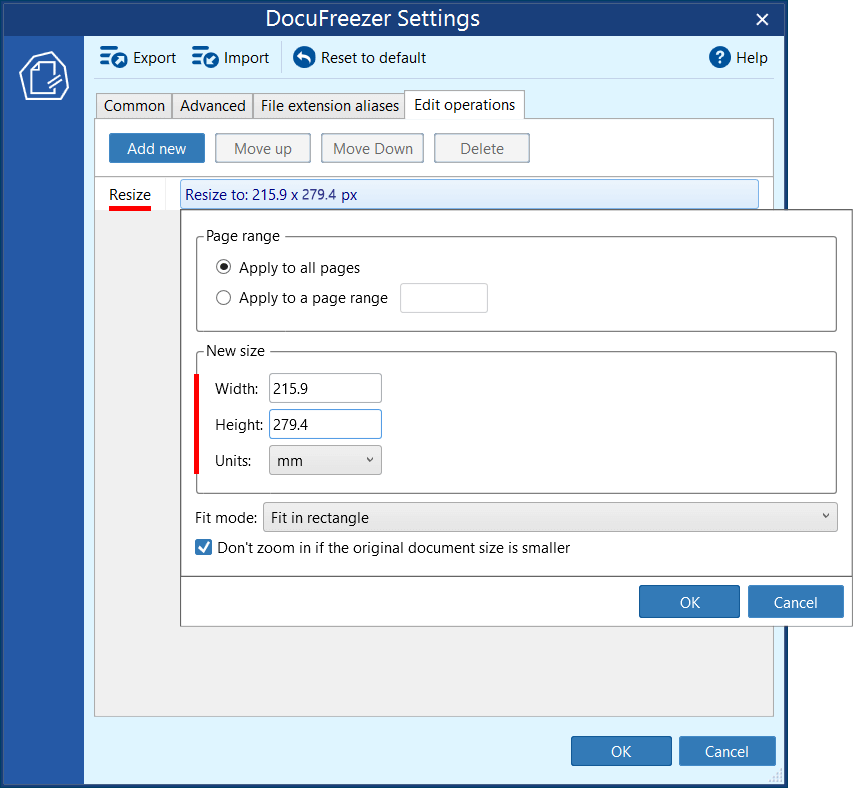
Additionally, you can merge all PDF files from your folder by choosing Multipage: Merge into one PDF.
5. My output files' EXIF metadata is missing. Is it possible to save or remove file metadata?
Customer question:
“I just converted a lot of HEIC files to JPGs, and it looks like the "Date taken" field wasn't preserved. Is there anything I can do about that?”
In DocuFreezer, you can choose whether to keep or remove file metadata when converting files. For instance, when converting HEIC images to JPG, you can preserve or remove information such as the date and time taken, GPS coordinates, or the author’s name in DocuFreezer's Advanced Settings.
To preserve metadata (EXIF, IPTC, XMP, etc.):
- Open Settings → Advanced settings.
- Find the Document → Conversion section.
- Choose the desired options under Save metadata.
- EXIF — stores technical details about how a photo was taken, such as camera settings, date, and GPS location.
- IPTC — contains descriptive and copyright information, like captions, keywords, and author details.
- XMP — is a modern, flexible format for storing and exchanging metadata from various standards (including EXIF and IPTC) within one file.
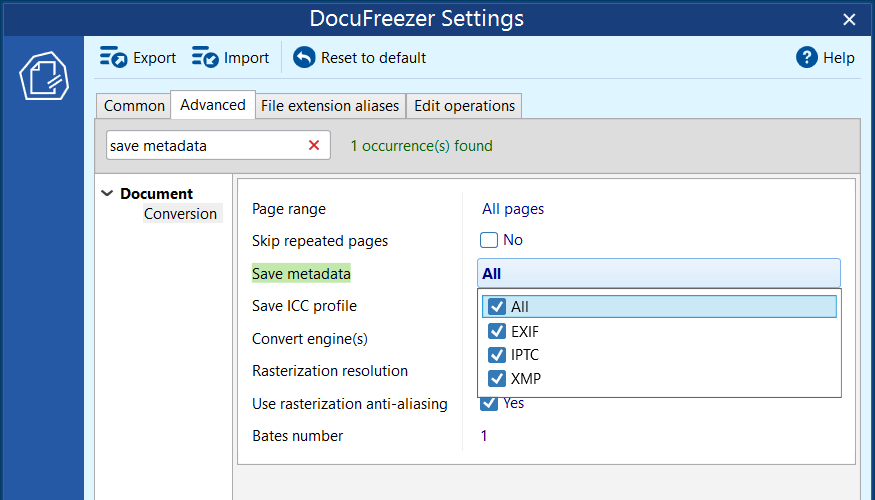
Tip: If you prefer to remove metadata (for privacy or file size reasons), simply disable some or all of the options under Save metadata. This can help you strip unnecessary details such as Date taken, GPS location, or Author name from your converted images.
6. A file can't be opened in CorelDraw after conversion by DocuFreezer ("The file is corrupted" error)
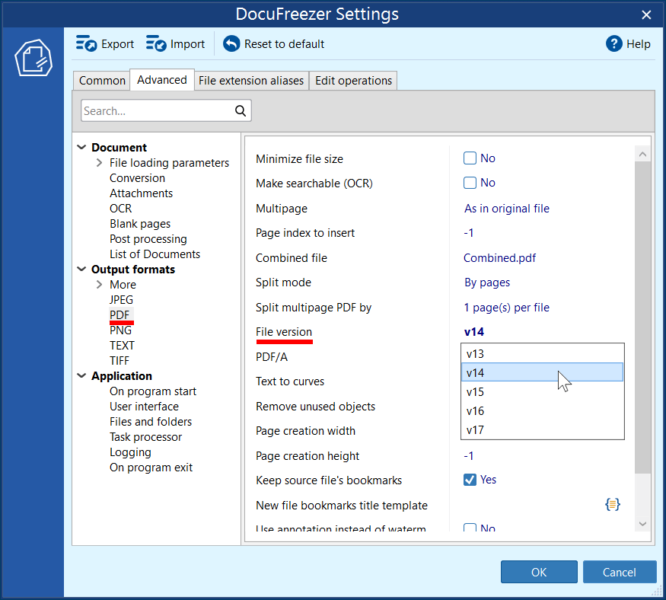
Sometimes CorelDraw is unable to open the PDF file created by DocuFreezer. This may happen after splitting a multipage document into several PDFs using the Multipage: Split into single pages option. This issue is caused by CorelDraw not supporting certain versions of PDF format.
To solve this problem, change the PDF format version to 1.4. To do it, navigate to DocuFreezer's Advanced Settings → Output formats → PDF and set File version:v14
7. Preparing documents to be printed in the correct order (without other print jobs in between)
Customer question:
“I’m trying to prepare multiple documents to be printed in a strict sequence, but the printouts come out in random order or get mixed with print jobs from other users. Is there a solution?”
Solution #1 – Combine all documents into a single PDF
- Add the required files to DocuFreezer’s List of files and make sure they appear in the correct order. You can sort them by Name, Type, etc., or manually drag and drop files to rearrange their order. This order determines how they’ll be combined.
- Set Output file type to PDF and click Settings.
- For Multipage, select Merge into one PDF.
- Click OK, then Start to begin converting.
- Once complete, open the Output folder to find your merged PDF file.
You now have a single, multi-page PDF containing all your documents in the correct sequence. Simply open it in your preferred PDF viewer or browser and print it (File → Print).
Solution #2 – Use Print Conductor with Single Print Job Mode
If you have Print Conductor installed, just add your files to the List of Documents in the right order. Then enable Single Print Job mode and start batch printing.
Learn more about Single Print Job mode on the Print Conductor website →
As a result, all your documents will be printed as a single, uninterrupted print job — in perfect order and without any "foreign" printouts getting mixed in.