
DocuFreezer User Guide
Get to know the main window, prepare your files, configure a conversion, and check the results. Use the settings reference whenever you need to change how a job works.
Getting started
If you’re using DocuFreezer for the first time, start with Your first conversion. It takes you from adding a document to opening the result. For larger batches, continue with Files and output; use Settings when you need to change how your files are converted.
For a quick introduction to the basic conversion steps, see the Quick Start Guide.
Install and open DocuFreezer
DocuFreezer converts your documents, images, emails, and drawings into PDF, plain text, or image files. You can mix supported source formats in one batch. Your conversion settings apply to the whole batch unless you assign a separate profile to selected files.
What you’ll need to get started
- Windows 11, 10, or 8.1.
- A mid-range computer: Intel Core i3 or AMD Athlon II X2 or faster, 8 GB of RAM, and 412 MB of disk space for the program, plus space for your source files, temporary files, and output.
- Microsoft .NET Framework 4.8.
- Additional software for some file formats. Most formats are processed by DocuFreezer’s internal engine. Others require an installed application, such as Microsoft Visio for VSD/VSDX or CorelDRAW for CDR. Check the Required software column in the supported formats list for your file types.
Install the program
- Get the Windows installer from the Download page. If you purchased DocuFreezer, use the commercial installer supplied with your purchase.
- Run the installer, choose the setup language, and follow its instructions. Installation and activation require administrator privileges.
- For a commercial installation, enter the supplied Serial Number when prompted. Read and accept the license agreement, choose the installation folder, and complete setup.
- Launch DocuFreezer.
The trial lets you evaluate the conversion functions, but it places a trial watermark on output pages and images. After more than 300 converted files, it prompts you to purchase a license. A trial watermark in the result is therefore different from a watermark added through Edit operations.
Activate your license
If you installed the commercial version, activate your license when you first launch DocuFreezer. Automatic activation is the easiest option: in the activation wizard, click Next to activate over the Internet, then Finish when activation is complete.
If automatic activation is unavailable, choose Enter activation code manually in the activation wizard. Open the webform linked beneath the Authentication Number, or visit activation.fcoder.com on a device with Internet access. Enter the Serial Number and Authentication Number, click Get Activation Code, and paste the returned code into Enter generated Activation Code in DocuFreezer. Click Next to complete activation.
Additional reference: Installation and activation.
Your first conversion
Try converting several of your own files. Add them to DocuFreezer, choose the output format you want, and click Start. You’ll find the converted files in your chosen output folder. If you’ve changed settings or loaded a profile before, check those values as you follow the steps.
- Add the source. Click Add files, select your files, and confirm the file picker. Their names appear in the List of files. Check that these are the files you intended to process.
- Choose the result. Select the format you want, such as PDF, in Output file type. This chooses the destination format; your source files can be different supported types.
- Choose where to save it. Use the folder button beside Output folder to select the destination. The initial default is your Windows Documents folder.
- Check the page settings. Open Settings → Common. Keep Page range: All pages. For PDF or TIFF output, use Multipage: As in original file to keep each source document’s pages together. Leave OCR off if the source already contains selectable text. Review Edit operations and Post-convert operations if you used them in an earlier job, then click OK.
- Run the conversion. Click Start. The program processes the files in the list and shows progress. Review any error information when it finishes.
- Open the result. Go to the chosen output folder and open the converted files. Check their contents, the first and last pages of multipage documents, and any page with a table or image.

The number of output files depends on your chosen format, Multipage settings, and attachment handling. A trial installation also adds its trial watermark.
Your original files stay in place when both Post processing actions are None.
Additional reference: Enable additional output formats.
Main window and menus
The main window brings together the input list, output controls, and commands for starting and managing a job.
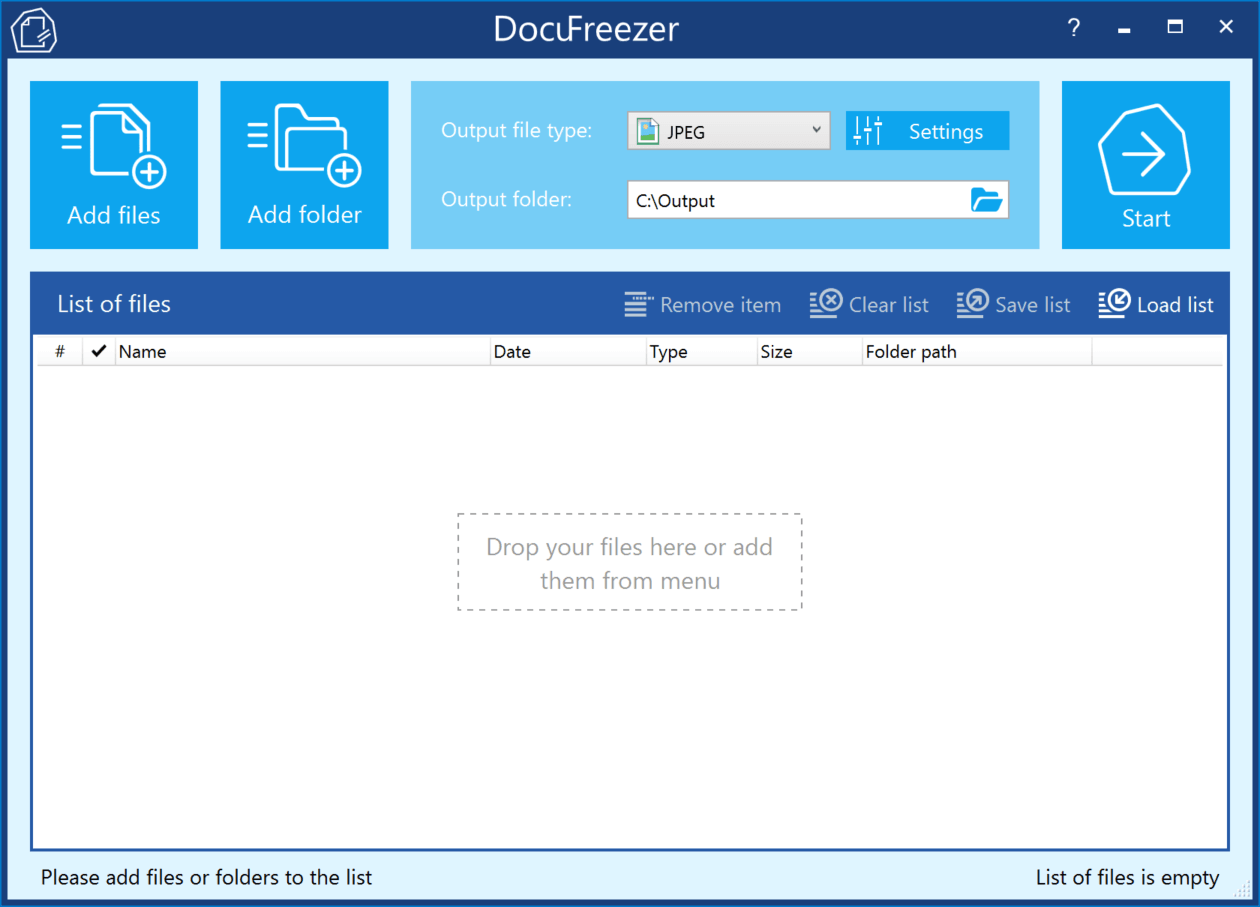
| Control or setting | What it does |
|---|---|
| Add files | Opens a file picker. Select one or more files to add to the current list. |
| Add folder | Opens the folder selection dialog. Add a folder and, if needed, restrict which filenames or file types are included. |
| Output file type | Selects the destination format. The Common settings tab changes to match this selection. |
| Output folder | Sets where the converted files will be saved. Enter a path or use the folder button. |
| Settings | Opens the conversion settings, including Common, Advanced, File extension aliases, Edit operations, and Post-convert operations. |
| Start | Begins processing the current List of files with the selected output and settings. |
| List of files | Shows the batch and per-file processing progress. Its column headers and right-click menu help you organize the list. |
| Remove item | Removes selected rows from the batch. It does not delete their original files. |
| Clear list | Empties the batch without deleting its source files. |
| Save list / Load list | Saves a reusable file list or imports one prepared earlier. |
| Logo in the upper-left corner | Opens the application menu: Edit INI settings..., View log..., Export log files..., Open log folder..., and About..., alongside the standard Windows window commands. |
| Question mark in the title bar | Opens About, where you can find the installed version and, for the commercial version, the Serial Number. |
Open the menu from the upper-left logo
Click the DocuFreezer logo in the upper-left corner of the main window to open the application menu. Alongside the Windows window commands, you’ll find Edit INI settings..., View log…, Export log files…, Open log folder…, About…, and Check for updates…
Use Settings for day-to-day changes. Edit INI settings... opens the settings file directly, for example when Support asks you to change a value. To investigate a failed conversion, use View log… or export the logs.
The file-list context menu
Right-click the list to access Show/hide columns and Item settings.... Use these commands to sort by email delivery time or assign profiles to selected files.
Quick access panel
The quick access panel, added in version 8.0, gives you access to program commands while you work with your files.
Files and output
Prepare the source list, then choose the output format and destination. The following sections cover input methods, list management, and file-conflict rules.
Add files, folders, and archives
Add your files in whichever way works best for you: click Add files, use Add folder, or drag and drop files into DocuFreezer. You can also add RAR, ZIP, and 7ZIP archives without unpacking them first.
Add individual files
Click Add files, select the documents, and confirm the file picker. You can also drag files directly from File Explorer to the List of files. To add more files, repeat the action; you do not have to prepare a separate batch for each source format.
Add a folder and restrict its contents
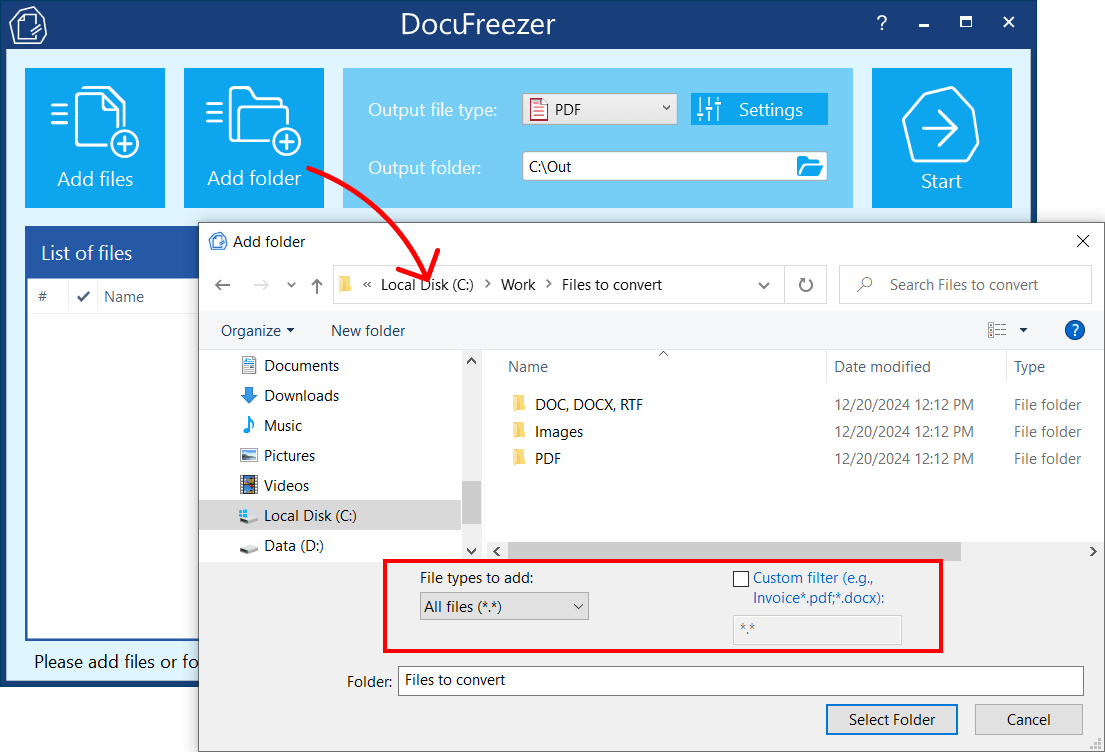
- Click Add folder.
- Browse to the source folder.
- Choose File types to add, or enable Custom filter and enter filename patterns. For example,
*.pdf,*.docxincludes PDF and DOCX files. - Click Select Folder and inspect the imported list.
Two Advanced settings control folder behavior. Recurse subfolders is enabled by default, so files in subfolders are included. Its exclusion field lets you omit selected subfolders. Restore subfolders is also enabled by default and recreates the source folder hierarchy beneath the output folder. These rules apply when files are added with the folder button.
To leave certain files out of every import, use Exclude files by mask. A mask is a filename pattern, such as *.db. The defaults — ~$*.*, *.db, and desktop.ini — exclude temporary Office files and folder metadata. Add each extra mask on its own line.
After a folder import, inspect the names and folder paths in the list. If files are missing, review the folder filter, subfolder exclusions, and Exclude files by mask. If unwanted files were added, remove those rows or refine the import filter before running the batch.
Add archive contents
You can add a ZIP, RAR, or 7Z archive just like a file. DocuFreezer extracts its supported contents for conversion. Files inside an archive still need any software listed in the format reference.
Add email messages
Drag messages directly from Classic Outlook into DocuFreezer; they appear in the list as MSG files. Direct email drag-and-drop is not supported from New Outlook or webmail. In those cases, save the messages as MSG or EML files, or download their attachments, and add the saved files.
You can also add PST and OST files; DocuFreezer extracts the contained messages. Choose an attachment rule before conversion, since one email can produce several output files.
Additional reference: Importing and converting email messages.
Additional reference: Adding files and importing lists.
Organize and reuse the file list
Select, remove, and sort items
Hold Ctrl while clicking individual items to select a group. For a consecutive range, click the first item, hold Shift, and click the last. Selection applies to list commands such as Remove item and Item settings...; to exclude a document from conversion, remove its row before clicking Start. The clear control empties the list.
Click a column heading to sort the list. Check the resulting order if you are creating a combined PDF or TIFF: the list defines the sequence of the source documents. For email chronology, right-click the list, enable Show/hide columns → E-mail delivery time, and sort by that heading.
Unique content in file list defaults to Yes. Set it to No in Advanced settings when you deliberately need duplicate entries. This option also matters when importing several PST messages with the same subject.
Save and load an FLIST
Click Save list to store the current list as an .flist file. Later, click Load list and select that file. Keep the original files available at their saved paths; an FLIST is a reusable list, not a package containing copies of the documents.
Import paths from a text file
A TXT list contains one full source-file path on each line, with no heading. For example:
C:\Documents\Contract.pdf
C:\Documents\Report.docx
C:\Scans\Page01.tif
To create the list, open Notepad, enter or paste the full file paths on separate lines, and save it as a TXT file, such as files.txt. In DocuFreezer, click Load list, select the saved TXT file, and click Open.
Additional reference: Create a TXT list from files in a Windows folder.
Import paths from a spreadsheet
Prepare an XLS, XLSX, or CSV file with #file as the first row of the column containing paths. Put one full path in each following row. Use Load list to import the sheet. The header identifies the column as source-file locations.
| Spreadsheet cell | Contents |
|---|---|
#file | Column header in the spreadsheet. |
C:\Documents\Contract.pdf | First source file, in the next row. |
C:\Documents\Report.docx | Second source file, in the following row. |
Additional reference: Import a file list from a spreadsheet.
Restore a previous session
Under On program start, Restore List of Files from last session defaults to No. Enable it if you want the previous list loaded automatically. Under On program exit, Show restore last session dialog defaults to Yes and offers to restore the current list in a later session.
After a job, Remove converted items from the list defaults to Yes: the program offers to remove completed entries. Set it to No if you want to keep them visible for another run. Clearing completed entries does not remove output files.
Choose the output format and folder
Choose the output format you need: a document to read, plain text to reuse, or an image of each page. Select it in Output file type, then choose your Output folder. You can also set both under Settings → Advanced → Output formats. Choose the format first so Common shows the options for that format.
Note: Some formats are not enabled by default because they are less commonly used and support for them is still under development. Learn how to enable additional output formats.
| Output format | What you get |
|---|---|
| Document output that can contain multiple pages, bookmarks, and searchable text. Image-only sources need OCR if their text must be searchable. | |
| TEXT (TXT) | Plain text without the original page design. Enable OCR when characters need to be recognized from images or scans. |
| JPEG | A raster image for each page. Quality controls the balance between detail and compression. |
| PNG | A raster image for each page, with color-space options and lossless image compression. |
| TIFF | Image output with a choice of color modes and compression. Can retain multiple pages in one file. |
| BMP | Bitmap image output, with true-color, indexed-color, and monochrome options. |
For example, a three-page source can become one three-page PDF or three JPEG page images. Multipage controls page grouping for formats that support it.
Where files are saved
The initial output location is your Windows Documents folder. Type another folder path or select it with the folder button. If you add a source folder and leave Restore subfolders enabled, look for the recreated subfolders within this destination.
To place results alongside their sources, enter {*SrcFileFolder} in Output folder. Before doing this, check the Existing file action setting, particularly when input and output have the same extension.
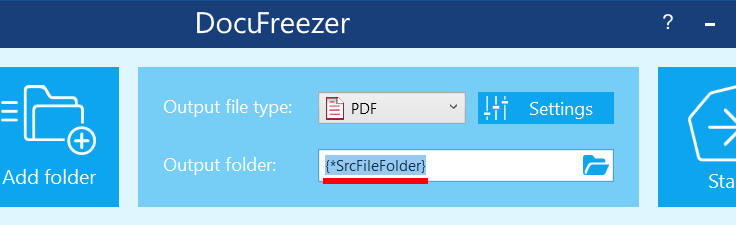
{*SrcFileFolder} in Output folder to save converted files in their source folders.What happens when a name already exists
If your output folder already contains a file with the same name, Existing file action decides what happens next. Create new file, the default, keeps the existing file and creates another. Overwrite replaces it; Skip leaves that source item unconverted.
A combined PDF or TIFF has its own rule: If combined file already exists. The default opens a dialog. Its other choices are Append to existing file, Create new file, and Overwrite. Review this rule before repeating a combined job.
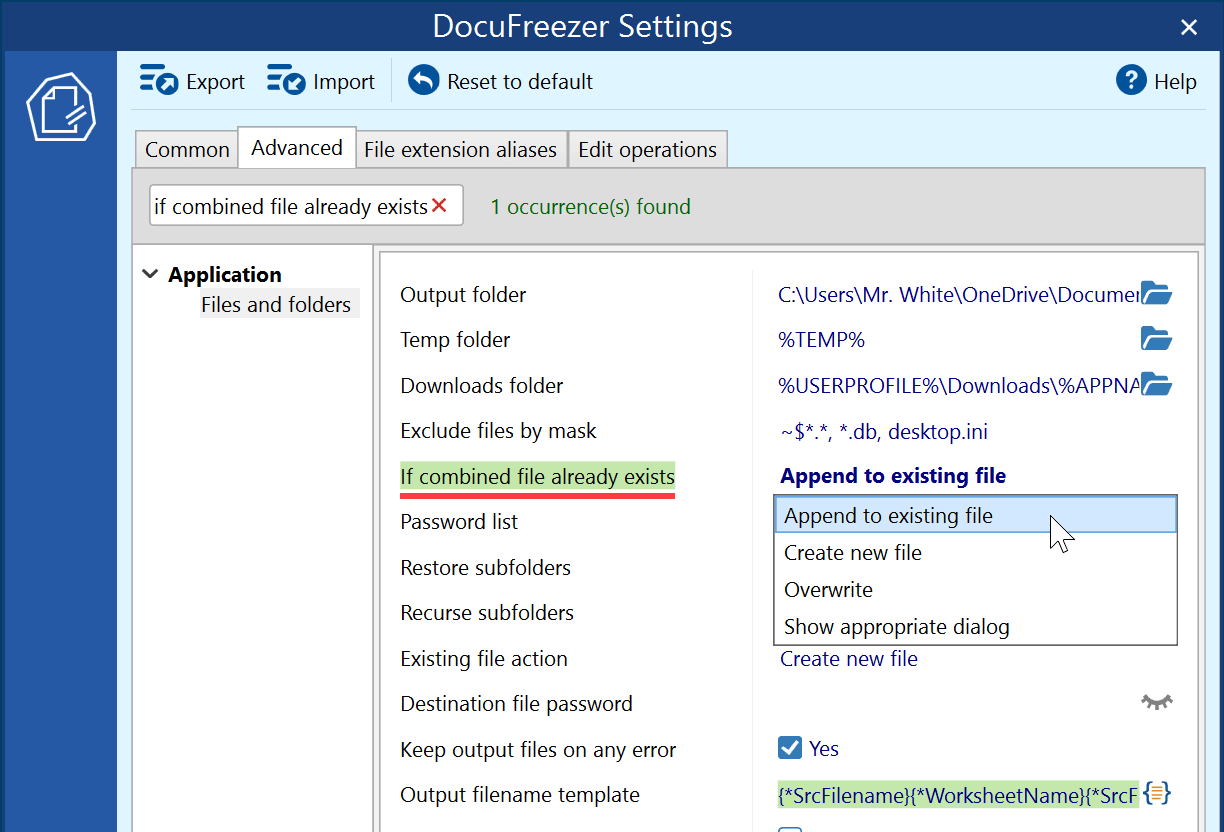
The filename pattern and the combined-document name are separate controls. See File names and macros to change them.
Settings
Open Settings when you want to choose pages, change image quality, add a watermark, or adjust another part of the conversion. The tabs below help you find the right options.
The defaults in this guide are the program’s initial values. Your current settings may differ if you’ve changed them or imported a profile. Also check any profiles assigned to files in the Custom settings column.
The Settings window
Click Settings beside Output file type. Use the tabs to choose conversion options, change how input files are read, or add operations. The Post-convert operations tab contains operations performed after conversion. Click OK when you’re ready, then return to the main window to start the job.
| Tab | What you can change |
|---|---|
| Common | Page range and the most frequently used options for the selected output format. |
| Advanced | A searchable tree of document, output, and application settings. Includes detailed input handling and processing rules. |
| File extension aliases | Associates a nonstandard filename extension with a supported file format. |
| Edit operations | Adds watermarks, annotations, rotation, resizing, cropping, grayscale processing, and rasterization. |
| Post-convert operations | Operations performed after conversion. |
| PDF signing | Adds signing operations for output PDFs. Select a certificate and configure the signature’s appearance. Multiple signing operations are applied from top to bottom. |
Controls above the tabs
Export writes the current configuration to an INI settings profile. Import loads a saved profile. Reset to default restores the program defaults. Help opens the DocuFreezer Settings page. You’ll find these commands at the top of the Settings window.
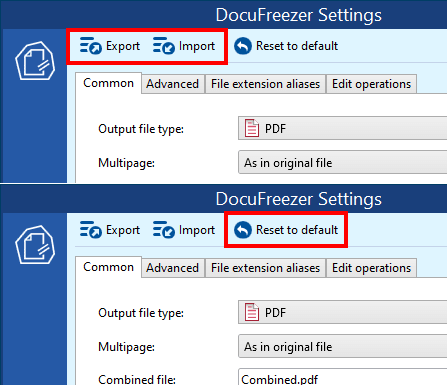
See Settings profiles for saving a working configuration and applying it to selected files.
Choose the scope of a change before you make it:
| Where you change it | What the choice applies to |
|---|---|
| Main window and general Settings | The current conversion job. Check item profiles for rows assigned their own settings. |
| File loading parameters → a source format | How matching input files are read, such as worksheet selection for Excel or comments for Word. |
| Output formats → the selected destination format | How the result is saved, such as PDF bookmarks or JPEG quality. |
| Edit operations → an operation’s page range | The pages receiving that operation. Other pages can still be converted. |
| List of files → Item settings... | The selected list items, using the INI profile you assign to them. |
Common settings
The Common tab shows page selection and frequently used options for the current Output file type. Select pages first, decide how to group them, then set OCR or image options. Only the controls relevant to the selected format are shown.

Page range
Keep All pages for the complete source document, or enter a range. The range is evaluated separately for each source file:
| Value | Pages selected |
|---|---|
1 | The first page of each source document. |
1,3,5-10 | Pages 1 and 3, then pages 5 through 10. |
last | The final page of each source document. |
last1 | The page immediately before the final page (penultimate page). |
1,last2,last1,last | The first page and the last three pages. Check overlapping selections in short documents; Advanced settings offers Skip repeated pages. |
This selects the pages to convert. The OCR range and an edit operation’s range can target subsets of those pages.
Multipage
For PDF and TIFF, decide whether the selected pages should stay with their original documents, become separate page files, or form one combined document. This choice affects the number of output files.
Consider two ordinary PDFs containing three and two pages. With all pages selected, no attachments, no blank-page removal, and a new output destination, the PDF results are:
| Multipage choice | Result for this example |
|---|---|
| As in original file — default | Two PDFs: one with three pages and one with two pages. |
| Split into separate files | Five PDFs when splitting by pages with one page per file. Other split settings can produce a different number of files. |
| Merge into one PDF | One PDF with five pages, following the source documents’ order in the list. |
For a combined result, set its name and review the settings for existing output files before starting.
To split a PDF into groups of several pages, use Split multipage PDF by.
PDF and TEXT
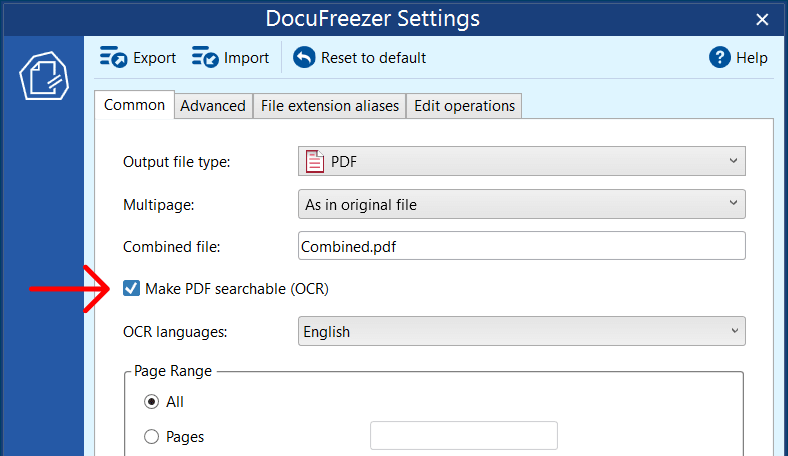
OCR is off by default. Enable it when PDF or TEXT output needs text recognized from scans or images; sources that already contain selectable text may not need it. See OCR and searchable text for the setup steps, language selection, and recognition checks.
JPEG
Choose True color to retain color or Grayscale for shades of gray. Quality ranges from 25% to 100%, with 85% as the default. Lower quality uses stronger compression and can blur fine text or edges.
Convert a representative page at the default quality first. If its size is too large, lower quality and compare the new image with the earlier one. Check small text and sharp lines at the intended viewing size. For more pixels in a page image, change Rasterization resolution; for different dimensions, use Resize.
BMP and PNG
Use the color-space choice to decide whether the image needs full color, gray tones, or black and white. BMP offers RGB/RGBA true color, indexed 256 or 16 colors, and monochrome. PNG offers true-color modes, grayscale, and monochrome.
RGB stores color channels; RGBA also has an alpha channel. Grayscale retains gray shades, while monochrome uses black and white. Inspect a page containing colored lines, shaded cells, or photographs after reducing its colors: information that depended on color must still be distinguishable.
If your source image contains transparent areas, choose PNG output and an RGBA color mode to retain them. Open a sample in an image editor that displays transparency and check the edges of the image.
TIFF
Choose Multipage first, then the required Color space and Compression. TIFF can store several pages in one file. Its color choices include true-color modes, indexed 256 colors, grayscale, and monochrome.
Compression choices are Default, Modified Huffman RLE, Group 3 Fax, Group 4 Fax, LZW, Jpeg, and Flate. Keep Default unless the program that will read your TIFF requires a particular color mode or compression.
Open the result in the application that will use it. For a multipage TIFF, check the later pages as well as the first; for monochrome output, check fine lines and shaded areas. Further TIFF container options are described under TIFF output settings.
Additional reference: Common settings reference.
Advanced settings
Expand Document, Output formats, or Application in the Advanced category tree. To find a known setting, type part of its name in Search.
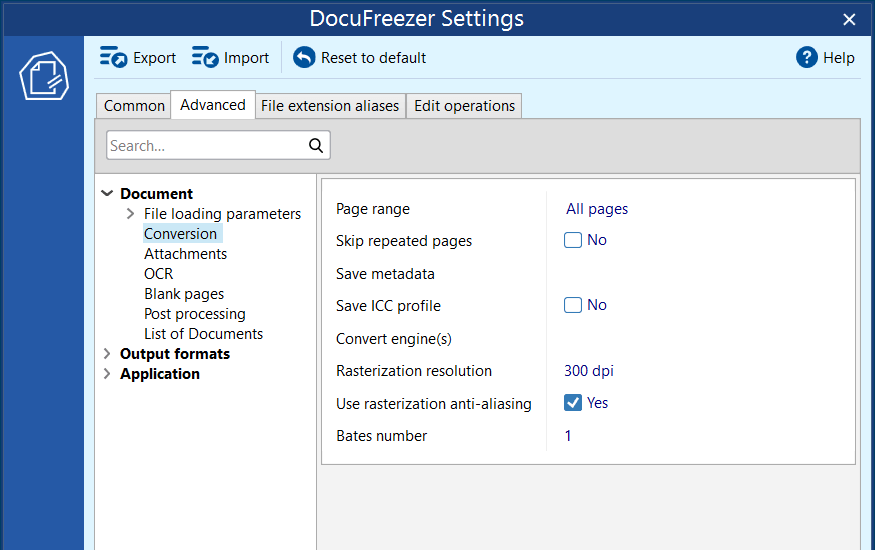
Click a value to edit it or choose from its available options. Hover over a setting name to read its description. Changed settings appear in semibold; after Reset to default, those values return to their defaults and normal text weight.
| Group | Settings inside |
|---|---|
| Document | File loading parameters and document settings: conversion, attachments, OCR, blank-page removal, and post processing. Also includes file-list settings. |
| Output formats | Output location and type, plus PDF, TEXT, and image-format options. |
| Application | Files and folders, processing engines and interface behavior, and logs. |
Additional reference: Advanced settings reference.
Document settings
In Settings → Advanced → Document, use Conversion for page selection, rasterization, and metadata; Attachments for attached files; OCR for text recognition; Signing for time stamps; Blank pages for blank-page removal; and Post processing for actions on source files after conversion.
Pages, resolution, and metadata
Page selection and repeated pages
Document → Conversion → Page range is the same setting you’ll find in Common. Turn on Skip repeated pages if overlapping ranges select a page more than once. It’s off by default.
Rasterization resolution
Rasterization turns a document page into an image made of pixels. Rasterization resolution starts at 300 dpi (dots per inch). Higher values add pixels, which can make fine detail clearer but also increase file size and conversion time. The documented range is 54–16384 dpi. Start at 300 dpi and compare a sample before increasing it.
Use rasterization anti-aliasing defaults to Yes and smooths the edges of text and shapes.
Keep or remove source metadata
Save metadata defaults to No. Enable the metadata types you need to preserve, such as EXIF, IPTC, or XMP. EXIF may include camera settings and capture date; IPTC can include captions and author information; XMP can carry a wider set of metadata. The result depends on what the source contains and what the destination format supports.
The Advanced conversion screen also includes Save ICC profile for the file’s color profile. To verify retained metadata, inspect the output properties; a date printed on a page does not confirm that its metadata was saved. Source-file modification timestamps have a separate control.
Attachments
For emails with attachments or PDF Portfolios, open Settings → Advanced → Document → Attachments and choose Attachments handling:
| Attachments handling | Output behavior |
|---|---|
| Separate: Document only (ignore attachments) | Converts the main document and skips all attachments. |
| Separate: Document and attachments | Converts the main document and each supported attachment into separate output files. This is the default option. |
| Separate: Document and attachments (save attachments as is) | Converts the main document and saves the attachments separately in their original formats. |
| Separate: Attachments only (ignore document) | Converts each supported attachment into a separate output file and skips the main document. |
| Combine: Attachments after document | Converts the main document and its supported attachments into one document, with attachments after the main document. |
| Combine: Attachments before document | Converts the main document and its supported attachments into one document, with attachments before the main document. |
| Combine: Attachments only | Converts and combines the supported attachments into one document, leaving out the main document. |
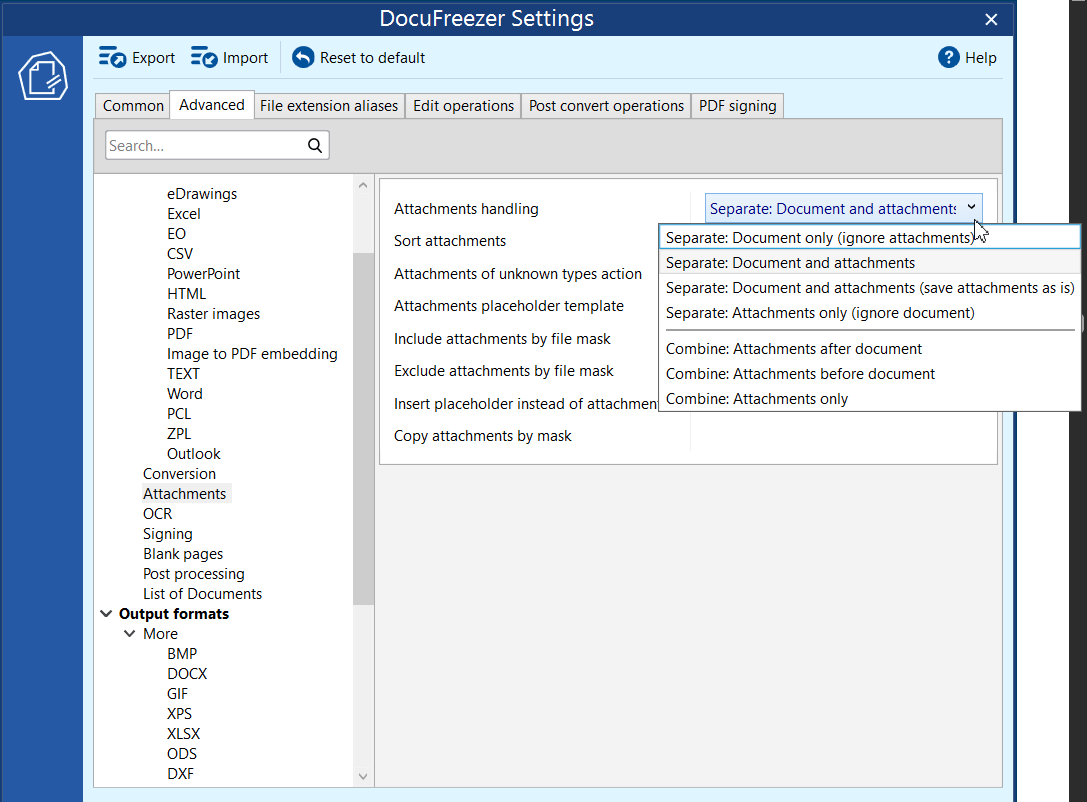
To keep each email and its attachments together, choose Combine: Attachments after document or Combine: Attachments before document. Use Multipage to control how pages from the whole batch are grouped.
For example, take a one-page email with a two-page PDF attachment. Choose PDF output, Multipage: As in original file, and all pages, with no attachment filters. Separate: Document and attachments produces two PDFs. Combine: Attachments after document produces one three-page PDF with the email first.
Save attachments as is
Under Attachments handling, choose Separate: Document and attachments (save attachments as is) to convert the main document while keeping its attachments as separate files in their original formats. For example, an email can become a PDF while its spreadsheet attachment remains an XLSX file.
Attachment order and filters
Sort attachments defaults to Name. It can sort by name, type, size, or date, in ascending or descending order, or leave attachments unsorted. The message order in the List of files is a separate choice.
Include attachments by file mask defaults to *.*, so all types are considered. Set *.pdf to include only PDF attachments. Exclude attachments by file mask starts empty; use it to omit specific types. These masks apply to attachments, rather than the folder-import filter.
Unknown attachment types
Attachments of unknown types action defaults to Ignore. Try to process asks the program to attempt conversion. Replace with placeholder inserts a substitute page, making it possible to see that an attachment occupied that position.
For placeholders, Attachments placeholder template defaults to Filename, which identifies the omitted attachment. Choose Browse for file to use your own file, or -Open Service page designer- to create a custom template.
Cover pages for selected attachment types
Under Settings → Advanced → Document → Attachments, enter a file mask in Insert placeholder instead of attachment by file mask. For example, *.xlsx replaces spreadsheet attachments with placeholder pages.
Use Attachments placeholder template to choose what those pages contain. Select Filename to show the attachment’s name, Browse for file to use an existing file, or -Open Service page designer- to create a custom template. See the linked setting for the available template choices.
To save copies of selected attachments separately as well, configure Copy attachments by mask. Check the output pages and saved attachments against the email’s attachment list. For unknown attachment types, Ignore under Attachments of unknown types action omits those attachments from the result.
Additional reference: Email input and attachment examples.
OCR and searchable text
OCR adds recognized text to PDF output or extracts it into a plain-text file. Set it up as follows:
- Select PDF or TEXT as Output file type.
- Open Settings → Common.
- Enable Make PDF searchable (OCR) for PDF, or the OCR option for TEXT.
- Select the languages used in the source. Confirm with OK and start the conversion.
- Check the result using the recognition checks below.
Select only the OCR languages used in your documents. See the supported OCR languages for the current list.
Advanced OCR controls
| Control or setting | What it does |
|---|---|
| OCR languages | Select the languages required for recognition; the default language selection is empty. |
| OCR page range | Default: All pages. Limit recognition to the pages that need it; this does not replace the conversion Page range. |
| OCR rasterization resolution | Default: 200 dpi. Controls the raster input prepared for text recognition. |
| OCR task number | Default: 10. Limits how many recognition tasks can run simultaneously. |
| OCR SIMD enabled | Enabled by default on 64-bit Windows. Allows the OCR engine to process image data in parallel more efficiently. |
| OCR remove noise | Enabled by default. Removes image noise before recognition. |
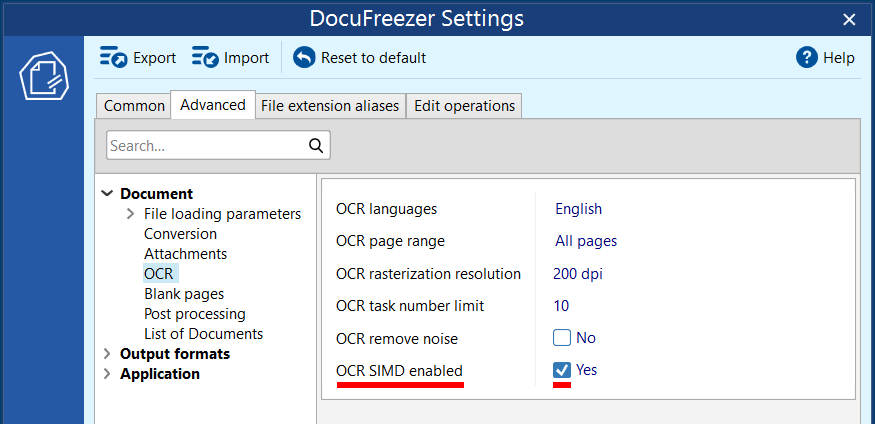
Improve the input before changing many settings
OCR works best with clear, straight text. Use a clean scan, avoid heavily compressed JPEGs, and remove accidental borders or speckles. If letters are blurred or missing in the image, scan the original again when possible: OCR can’t recover detail that isn’t there.
Open the PDF and search for a phrase you can see on the page. For TEXT, open the TXT file in the program where you’ll use it. Compare names, numbers, and punctuation with the original. If recognition is wrong, check the languages and scan quality. For searchable PDF output, keep Flatten PDF (non-searchable text) disabled.
Additional reference: OCR settings and source-quality advice.
Further reading: OCR and searchable PDF conversion.
Signing
Open Settings → Advanced → Document → Signing to configure the time-stamp service used for digital signatures.
| Control or setting | What it does |
|---|---|
| TSA time stamp server | The address of the Time Stamp Authority service used during signing. |
| TSA credentials | Credentials for access to the time-stamp service. |
To select a certificate and configure a signature’s appearance, use the PDF signing tab.
Additional reference: Signing settings.
Blank pages
Turn on Remove blank pages to leave blank pages out of the result. It’s off by default. Min pixels quantity threshold starts at 0.5% and Min channels difference threshold at 4%. These thresholds help determine how much nonwhite content counts as a mark on the page.
Compare page counts and inspect pages near every omission, especially those with faint text or light marks.
Additional reference: Blank-page removal settings.
Post processing
Use Post processing to organize source files according to whether conversion succeeded or failed.
Open the Post processing group to set Successfully processed files and Files that failed to process. Each defaults to None. The choices are Copy to folder, Move to folder, Delete files, and None.
Select Move to folder to relocate processed source files, or Delete files to remove them. Keep both actions at None when the job should only create converted copies. Test changes on disposable copies, checking the source-action destination as well as the output folder.
Review job status before relying on these actions. The Keep output files on any error setting can retain output from a partially failed item.
Additional reference: Post processing settings.
File loading parameters
Open Advanced → Document → File loading parameters and choose your source format. The groups below follow the order in the application. These settings control how source files are read before conversion.
CAD drawings
In the CAD group, choose the worksheets or Model view you want to convert. Then check the layers, paper size, line weights, and fonts before creating your PDF or image files.
| Control or setting | What it does |
|---|---|
| Worksheet name | Default: *all*. Select all worksheets, use *default* for the active worksheet, or enter an exact worksheet name. |
| Split worksheets | Default: No. Saves drawing worksheets separately when enabled. |
| “Model view” tab processing | Choose whether to ignore Model view, process all tabs, or process Model view only. |
| Disable “Not to Plot” layers | Default: No. Enable it to omit layers marked as not intended for plotting. |
| Fonts to bold | Default: No. Renders text with a heavier appearance. |
| Default line weight | Default: -1. Sets the fallback line thickness. |
| Display line weight | Default: As in document. Yes uses drawing line weights; No uses the default line weight. |
| Paper size limit | Default: A3. Select a maximum standard or custom page size. |
| Try to use SHX fonts | Default: Yes. Uses available SHX drawing fonts. |
| SHX font folders | Empty by default. Add folders containing the SHX fonts needed by your drawings. |
| Load as grayscale | Default: No. Loads the drawing in shades of gray. |
| .CTB file path | Optional path to a Color-Dependent Plot Style Table (.ctb). |
| Page margins | Default: 0, 0, 0, 0. Sets left, right, top, and bottom margins in points. |
If text appears too thin or incorrect, check SHX font availability before changing the output image quality. If extra construction layers appear, inspect the Disable “Not to Plot” layers setting. For raster output, Rasterization resolution controls the detail of the resulting page image.
Check the format reference for required engineering applications. DocuFreezer can also use eDrawings Viewer to convert DWG/DXF to PDF when Microsoft Print to PDF is installed. DocuFreezer supports eDrawings 2026 automation.
Inspect a drawing that contains small dimensions, thin lines, and text using the project’s fonts. Compare its visible layers and page boundaries with the intended source layout. If a layout is absent, review worksheet selection and Model view processing before adjusting resolution.
Additional reference: CAD rendering options.
Email messages
Email messages don’t have a fixed paper layout. Choose a page size and margins, then decide whether to keep the message header. To include attached files, see Attachments.
For MSG and EML messages, open Settings → Advanced → Document → File loading parameters → Email message and use Page size to choose a default, standard, or custom output paper size. Default uses the paper size associated with the Windows locale. Email margins default to 20 points on each side. Keep message header defaults to Yes; disable it when the output should omit the message header.
Message header layout
DocuFreezer uses an Outlook-style layout for the converted email header. Leave Keep message header enabled when you want that information included in the output.
Use the email delivery time for the output PDF
You can use a message’s delivery time as the last-modified date and time of its output PDF. This is useful when you want the saved PDF’s file properties to reflect when the email arrived.
This choice is separate from retaining the source file’s modification time or sorting messages by delivery time. Check the PDF’s Date modified in Windows File Explorer against the message’s delivery time.
Further reading: Save emails as PDF or images.
Visio
Pause after loading the file sets a delay in seconds after opening a Visio document.
eDrawings
Scale mode offers Shrink, Fit, and Original for CAD rendering.
Excel workbooks
Choose the worksheets to include, then their layout and visible elements:
| Control or setting | What it does |
|---|---|
| Split worksheets | Default: No. Enable it to create a separate output file for each worksheet. |
| Hide main window | Default: Yes. Keeps Excel or its alternative application window hidden during conversion. |
| Export scale mode | Default: Original. Fit scales small sheets up and large sheets down to fit the output page. |
| Worksheet names | Default: *all*. Use *default* for the active worksheet, or enter the actual names of the worksheets to process. |
| Keep headings | Default: No. Adds spreadsheet row numbers and column letters to the output. |
| Keep comments | Default: At the end of sheet. Other options: As displayed on sheet or Without comments. |
| Export page orientation | Default: As in document. Other choices: As in printer, Portrait, or Landscape. |
| Show gridlines | Default: No. Shows or hides the grid between cells. |
| Auto fit columns | Adjusts column widths. |
A worksheet can span several output pages. Export scale mode and Export page orientation control how its content fits those pages. Split worksheets separates worksheets into files; the output format’s Multipage setting also affects how pages are grouped.
EO
Render HTML as if for printing selects print-style rendering for HTML handled by the EO component.
CSV
Separator defines the delimiter between fields; Auto fit columns adjusts column widths.
PowerPoint
Slide layout controls the number of slides per output page.
HTML
If an HTML file shows unreadable characters, check its character encoding. If the text looks right but the page is too wide or tall, adjust the page size and fitting options below.
Code page controls how HTML characters are decoded. Page size can follow the Windows locale, use a standard paper size, or use custom dimensions. HTML Page margins default to zero on each side.
Zoom level adjusts HTML scaling. Auto fit X defaults to Shrink to fit, while Auto fit Y defaults to None. These controls fit content horizontally and vertically. Check them when a wide page is clipped or spread across more pages than expected.
Inspect accented characters and the right edge of the widest content, such as a table. Check the final page too: correct text on the first page does not establish that the full HTML content fits the output.
DocuFreezer also supports MHT/MHTML web page archives. Their MHT-to-PDF processing component is selected separately under Application → Task processor → Rebex MHT to PDF engine.
Further reading: All HTML input settings.
Raster images
Color profile action selects how color profiles are applied. To use an external profile, select Apply external profile and set ICC profile path.
HEIC and HEIF images
Install ImageMagick, or use the HEIF and HEVC codecs on a supported Windows system, to provide HEIC/HEIF decoding. Then add the photos like other files. The Show HEIF error dialog setting is enabled by default and reports when a required component is missing. The About window can show that ImageMagick is installed.
For capture dates and photo metadata, use Save metadata. For photos placed in a PDF, see Image to PDF embedding.
Convert one photo and check that it opens correctly before adding the rest.
Additional reference: HEIC/HEIF components and image settings.
PDF input
Use PDF input settings (File loading parameters → PDF) to control annotations, the order of files in a PDF Portfolio, and transparency during rendering. To change the new PDF’s page grouping, bookmarks, or compression, use PDF output settings instead.
Draw annotations defaults to Yes and includes source PDF annotations and comments in processing. Portfolio files pre-sorting defaults to Unsorted; select By index when Portfolio items need to follow their index order. Use the separate Attachments group to choose how Portfolio contents are handled.
Consider transparency during rendering defaults to No. Enable it to preserve PDF transparency (the alpha channel) when rendering PDFs to raster images. When disabled, transparent areas are filled with white.
To omit source annotations and comments from the result, set Draw annotations to No.
Image to PDF embedding
Under File loading parameters → Image to PDF embedding, Load image as JPEG defaults to No. Enable it to embed non-JPEG source images using JPEG encoding. This can reduce the PDF’s size, with a possible loss of image detail. Its separate JPEG quality control defaults to 75% and accepts 25–100%.
This embedding quality is different from the 85% default for JPEG output. Check which group you are editing: one changes images inside a PDF, while the other creates JPEG files. Compare file size and fine detail after changing embedding quality.
Plain-text input (TEXT)
A TXT source has characters but no fixed printed page design. These settings supply its font, spacing, paper size, and margins when DocuFreezer lays it out as pages. Choose the source encoding first if characters are unreadable, then adjust the layout.
| Control or setting | What it does |
|---|---|
| Code page | Default: Default (Current ANSI code page). Select the source character encoding when text is decoded incorrectly. |
| Font | Default: Consolas, 11. Sets the typeface and size used to lay out the text. |
| Line spacing | Default: 0.15. Sets line spacing in points. |
| Paper size | Default: A4. Choose a standard size or custom dimensions. |
| Page margins | Default: 20, 20, 20, 20 points for left, right, top, and bottom. |
For the encoding of a TXT result, see TEXT output.
Check a long line and any non-English characters in the result. Font size, spacing, and paper dimensions affect line wrapping and page count, so compare the final pages after changing them.
Word documents
If your Word document has comments, tracked changes, fields, or bookmarks, decide which ones you want in the result. For mail merge, you’ll also need the Excel file containing your data.
| Control or setting | What it does |
|---|---|
| Update fields | Default: No. Refreshes dynamic Word fields, such as dates and names, before conversion. |
| Hide revisions | Default: No. Hides revision marks in the converted document. It does not accept or reject tracked changes in the original document. |
| Skip comments | Default: No. Controls whether Word comments are omitted. |
| Markup mode | Default: As is. Other choices are Balloon revisions, Inline revisions, and Mixed revisions. |
| Keep bookmarks | Default: In-text bookmarks. You can select Heading bookmarks or Without bookmarks instead. |
| Enable macros | Default: No. Controls execution of document macros when a macro-enabled Word file is processed. |
| Downscale shapes to page size | Default: No. Shrinks oversized embedded images to fit the page. This also applies to Outlook EML/MSG input. |
| Mail merge | Default: No. Processes a Word document using data from an Excel source. |
| Mail merge data source | Specify the Excel file to use. For mail merge, also enable Update fields. |
Inspect a page containing the feature you changed: a comment, revision, bookmark, dynamic field, or merged value. For updated fields and mail merge, check the actual dates and values inserted.
PCL and PLT
For PCL files with incorrect page breaks, check Lines per page against a copy with the expected layout. For PLT drawings, check the detected drawing dimensions.
Lines per page defaults to -1, meaning the default behavior. Detect .PLT file dimension is enabled by default and helps determine the dimensions of plotter input.
Compare where text continues onto the next page and whether the plot fits within the intended page boundaries. Keep a sample with a known correct layout when evaluating a change.
ZPL labels
DocuFreezer includes a component that renders ZPL files locally, without sending the label to an online conversion service. Match the following size and resolution settings to your label design.
Set your label’s width, height, and resolution. Width defaults to 4 inches and Height to 6 inches. Dpmm means dots per millimeter; its default is 8. The choices are 6, 8, 12, and 24 dpmm — approximately 152, 203, 300, and 600 dpi.
If you use an older ZPL configuration with an online conversion service, Proxy host, Proxy port, and Max labels per request control its connection and requests. Offline conversion does not require these connection settings.
Convert a label with known dimensions and inspect its page size, text, barcode, and outer edges. If the label is clipped or has the wrong proportions, recheck the width, height, and Dpmm against the source design before changing general image quality.
Outlook
Under Outlook input settings, Use email subject as filename when adding Outlook emails via drag-and-drop defaults to Yes. For chronological output, sort by E-mail delivery time; to preserve file modification timestamps, use Keep source files’ original date/time.
Limit filenames created from Outlook messages
A filename-length limit is available for MSG and EML files created when messages are dragged from Outlook. Use it when long message subjects would produce names that are difficult to handle. Check the resulting names in the input list; the names of converted files are controlled separately by the output filename template.
Output format settings
Choose your output format’s group when you need a particular PDF version, text encoding, image resolution, or compression. To change which content is read from the original, use Input format settings.
Available output formats
In the Advanced navigation tree on the left, click the Output formats group itself to find Available output formats. This setting controls the formats offered in the main window. The standard set is PDF, TEXT, JPEG, TIFF, PNG, and BMP.
To configure an additional format, expand Output formats → More and select the corresponding format, such as BMP, DOCX, or XPS. Some additional formats have limited conversion support and may not work correctly.
JPEG
Under Advanced → Output formats → JPEG, you can adjust Pixel type, Create thumbnail, Write creator string, Horizontal resolution, Vertical resolution, Mode, Sampling, Quality, Optimize huffman tables, and Interleaved. For resolution, -1 uses the default value. See JPEG in Common settings for the basic quality setting.
Open Advanced → Output formats → PDF for the controls below. See Multipage for page grouping and Combined file for naming a merged document.
Document structure
| Control or setting | What it does |
|---|---|
| Split multipage PDF by | Default: 1 page per file. Used with Multipage: Split into single pages. Enter 5, for example, to create files containing groups of five pages. |
| Page index to insert | Default: -1, which appends new pages. Use 0 to prepend them, or 5 to insert them after page 5. |
| Keep source file’s bookmarks | Default: Yes. Retains bookmarks when they are available from the source. |
| New file bookmarks title template | Creates bookmark titles using a pattern. Insert {*SrcFileName} to identify the source documents by name, or use the macro menu for other values. |
To add pages to an existing PDF, select its folder and enter its name in Combined file. Choose Append to existing file under If combined file already exists, then set Page index to insert. Check where the old and new pages meet and where any bookmarks lead. Running the same append job again adds those pages again.
Size, compatibility, and text
| Control or setting | What it does |
|---|---|
| Minimize file size | Default: No. Reduces PDF file size. Select the AsposePDF editing engine as described under Reduce PDF file size. |
| File version | Default: v13. Choose v13–v17 for PDF versions 1.3–1.7. |
| PDF/A | Creates archival PDF output, including PDF/A-2b. |
| Flatten PDF (non-searchable text) | Default: No. Rasterizes PDF page content into images. Text becomes unavailable for searching, selection, and copying. |
| Page creation width / height | Default: -1, meaning the default dimensions. These control newly created PDF page dimensions. |
If another program requires a particular PDF version, check the result in that program before processing the full batch.
Reduce PDF file size
Use this when a PDF is too large to store or share. The AsposePDF method is especially useful for documents containing raster images.
- Open Settings and select Advanced.
- Go to Application → Task processor → PDF file editing engine and choose AsposePDF.
- Under Output formats → PDF, turn on Minimize file size.
- Click OK, choose PDF output, and convert a sample.
Compare its file size with a copy converted without this option. Check small text and image detail too; the amount of reduction depends on the document.
PDF/A for archiving
Choose PDF/A when the organization receiving your documents requires that archival format. Use the PDF/A option in the PDF output settings, then check the saved file with the receiving system or a PDF/A validator.
PDF/A-2b is a particular archival standard. Confirm that it matches the required PDF/A level before submitting the document.
Digital signatures
You can digitally sign output PDFs using a certificate from a .p12 file or a hardware token. Have the certificate file or token available when you configure signing.
After conversion, open the PDF in a reader that supports digital signatures and inspect the signature details. A visible logo or scanned signature added with Image watermark does not create a certificate-based digital signature.
For source images placed in a PDF, see Image to PDF embedding.
PNG
Open Advanced → Output formats → PNG for image color, palette, transparency, compression, and resolution controls. The basic color choices are also available in Common settings.
Image encoding controls
| Control or setting | What it does |
|---|---|
| Pixel type | Choose full color, grayscale, or monochrome. |
| Quantize colors / Quantize quality | Controls palette reduction and its quality for formats offering these options. |
| Alpha threshold / Quantize alpha channel | Controls how transparency is handled during palette and alpha-channel conversion. |
| Dithering | Uses patterns of pixels to approximate shades when the available colors are limited. |
| Horizontal resolution / Vertical resolution | Stores the image resolution for each axis. -1 uses the default value. |
| Write creator string | Controls whether creator identification is written to the image metadata. |
| Flate compression level | Sets the compression level used for PNG image data. |
TEXT
Open Advanced → Output formats → TEXT for plain-text output settings.
For TEXT, Multipage can keep each source as one text file, save pages separately, or combine the contents. For scanned sources, configure OCR.
Set Code page to the encoding your receiving program expects, such as UTF-8, Unicode Big-Endian, or US-ASCII. Write BOM adds a Byte Order Mark, an encoding marker at the start of the file. Include it if that program requires it, then check the characters and line breaks there.
TIFF
Open Advanced → Output formats → TIFF for the following controls. Color, palette, transparency, dithering, and resolution options are similar to those described under PNG. TIFF also offers Create thumbnail.
TIFF combines image encoding with document structure. Alongside Multipage, Combined file, and Page index to insert, it offers color-space preservation, Compression, JPEG quality and sampling, and Flate compression level.
The remaining controls describe the TIFF container: Fill order, Photometric mono, T4 options, Is big TIFF, Little-endian, Tiled, Multi strip, and Use LZW/Flate predictor. Leave these unchanged unless you need to meet the requirements of the program that will read the TIFF.
Files and folders
These groups control output names, passwords, timestamps, and temporary storage. For instructions on choosing a destination and handling existing files, see where converted files are saved and what happens when a name already exists.
File names and macros
Change the filename template when the output needs a predictable prefix, page suffix, date, or other source information. Find Output filename template under Advanced settings, in Files and folders. Fixed text stays the same; each macro is replaced with its value for the file being processed.
The default template
{*SrcFilename}{*WorksheetName}{*SrcFileMPageNo}.{*DstFileExt}| Macro | Value inserted |
|---|---|
{*SrcFilename} | Source filename without its extension. |
{*WorksheetName} | Worksheet name when applicable, for example for a spreadsheet or drawing. |
{*SrcFileMPageNo} | Source page number for multipage output naming. Avoids adding a page-number 1 to a single-page source. |
{*DstFileExt} | Extension for the selected output format. |
Click {=} to insert a macro from the menu. A recognized macro turns light green in the field. Names are not case-sensitive. You can mix macros with spaces, dashes, underscores, and other valid filename characters. A metadata macro has no useful value when that metadata is absent from the source.
Keep the output extension in the pattern. Avoid Windows filename characters such as < > : " / \ | ? * in literal text; the asterisk inside a supported macro is part of its syntax.
Useful patterns
| Template | Result |
|---|---|
Archive-{*SrcFilename}.{*DstFileExt} | Adds Archive- before the original name. |
{*SrcFilename}-{*Date(yyyy-MM-dd)}.{*DstFileExt} | Adds the processing date in year-month-day form. |
{*SrcFilename}{*WorksheetName}{*SrcFileMPageNo(_{0:D3})}.{*DstFileExt} | Uses a three-digit page suffix, such as _001. Change D3 to D4 for four digits. |
Combined-document names
A merged PDF or TIFF uses Combined file, which defaults to Combined.pdf or Combined.tif. Enter a fixed name or suitable macros there; the ordinary filename template does not apply. For a document produced from a container such as an email or archive, {*ContainerName}.pdf uses the container name.
Ask for a value at the start of a batch
User-defined macros let you enter a shared prefix or suffix when a job begins. For example:
{*UDM(Prefix)}-{*SrcFilename}-{*UDM(Suffix)}.{*DstFileExt}Save the template and click Start. DocuFreezer opens Define user macros because the template contains UDM fields. Enter the Prefix and Suffix, then click OK. Values are applied to the current batch. A suffix can contain a date macro such as {*Date(yyyy-MM-dd)}.
Number files by their position in the list
The ListItemNo macro can insert the item’s number in the List of files into an output filename or a watermark, with number formatting. Use the macro menu to insert the expression, then check a sample result before applying the pattern to a batch.
Sort the list first if the numbering needs to follow a particular document order. An item number identifies a file in the batch; for numbering individual pages, see Page numbers and Bates numbers.
Email values in names and watermarks
Email macros are available for MSG and EML messages. Choose the email value you need from the macro menu and combine it with fixed text in your filename or watermark. Check the result with a message containing that value, and use only valid filename characters in a naming pattern.
For example, this filename pattern adds the email’s delivery date before the original filename:
{*MsgDeliveryTime(yyyy.MM.dd)} - {*SrcFilename}.{*DstFileExt}For an email named Invoice.msg, delivered on October 19, 2026, PDF output would be named 2026.10.19 - Invoice.pdf.
Other macro values
The macro menu also includes the source folder and full path, file type, author, creator, total pages, Windows user and computer names, item number in the list, and formatted date or time. These can be useful in a watermark as well as in a filename. Select a value appropriate to the destination: a complete Windows path, for example, cannot be inserted unchanged as ordinary filename text.
Test the pattern with single-page and multipage sources. Inspect the saved names and confirm that separate page files have distinct page suffixes.
Additional reference: Output filename examples.
Additional reference: User-defined macros.
Source files and storage
Open Settings → Advanced → Application → Files and folders for these controls, shown in interface order.
| Control or setting | What it does |
|---|---|
| Output folder | Sets the destination for converted files. See where files are saved. |
| Temp folder | Default: %TEMP%. Stores temporary processing files. |
| Downloads folder | Default: %USERPROFILE%\Downloads\%APPNAME%. Stores downloaded files and items needed to restore a session. |
| Exclude files by mask | Excludes matching filenames from the input list. Enter each mask on a separate line. |
| If combined file already exists | Controls an existing combined PDF or TIFF. See existing output files. |
| Password list | Enter passwords for protected source files, one per line. |
| Restore subfolders | Default: Yes. Recreates source subfolders in the output when importing with Add folder. |
| Recurse subfolders | Default: Enabled. Includes subfolders when importing with Add folder. |
| Existing file action | Default: Create new file. Controls output files with names that already exist. |
| Destination file password | Sets a password for supported output documents. |
| Keep output files on any error | Default: Yes. Keeps output even if processing reports an error. Choose No to suppress output on errors. |
| Output filename template | Sets output names using fixed text and macros. See file names and macros. |
| Attached filename template | Sets the names of output attachments. Default: {*SrcFilename}.{*DstFileExt}. |
| Keep source files’ original date/time | Default: No. Preserves the source file’s last-modified date and time in the output file properties. |
If you set a destination password, test opening the converted document with it.
Application behavior and processing
Application settings control the interface, startup behavior, progress display, logs, and conversion components. If a document looks wrong, start with its input, output, and edit-operation settings. Change an engine or timeout when you’re troubleshooting a processing problem.
Interface and startup
| Control or setting | What it does |
|---|---|
| Interface language | Default: English. Select the language used by the program interface. |
| Allow only 1 copy of DocuFreezer at a time | Default: Yes. Prevents multiple instances from being opened. |
| Show dialog on job completion | Default: Yes. Displays the completion dialog. |
| Show HEIF error dialog | Reports the component requirements described under HEIC and HEIF input. |
| Check for updates | Default: Yes under On program start. Controls automatic update checking. |
List restoration at startup and exit is covered under Restore a previous session.
Task processor
| Control or setting | What it does |
|---|---|
| Timeout | Defaults: 5 minutes for response timeout and 100 minutes for task processing timeout. A timed-out item does not hold the batch indefinitely. |
| Memory leaks limit | Default: 512 MB. An engine-restart threshold for accumulated memory leaks, rather than a statement of total RAM required by a job. |
| Restart after jobs number | Default: 4096. Periodically restarts the processing engine. |
| Enable custom scripts | Default: Yes. Allows custom scripts that alter processing behavior. Disabling it returns those behaviors to the standard configuration. |
| Display progress bar for each file | Default: Yes. Shows per-item progress; hiding it may reduce interface work for large batches of small files. |
| Kill hanging processes | Default: Yes. Allows cleanup of helper processes started during processing when no longer required. |
| Use internal engines whenever possible | Default: No. When enabled, tries built-in engines before external components. |
| Keep source files available for editing | Default: No. Enable it to allow source files to be opened and edited while DocuFreezer is processing them. |
Engine selectors
The default engines are GDIPlus for Raster image engine, AsposeWords for Rebex MHT to PDF engine, Rebex for extracting email attachments, and AsposeCells for importing a file list from Excel. Disabled helpers includes Acrobat by default. Convert engine(s) is empty unless specific engines are configured.
AsposePDF provides PDF processing and the editing engine used for file-size reduction. It also supports converting large PDFs to images by rendering them in strips. After conversion, check that every page and its edges are complete.
An engine setting for importing a spreadsheet list is different from the settings for converting an Excel workbook. The first reads file paths; the second renders worksheet contents.
After changing a processing component, rerun the affected sample with the same conversion settings and compare its status and output. Export the log if the problem remains.
File extension aliases
If a file uses an unusual extension, an alias tells DocuFreezer which supported format to read it as. The contents must already match that format. For example, a PDF saved as Document.invoice still contains PDF data.
- Confirm the file’s actual format before assigning an alias.
- Open Settings → File extension aliases.
- Click the value beside the supported format, such as PDF.
- Add the extension without the dot, for example
invoice, and click OK. - Add the source files to the conversion list.
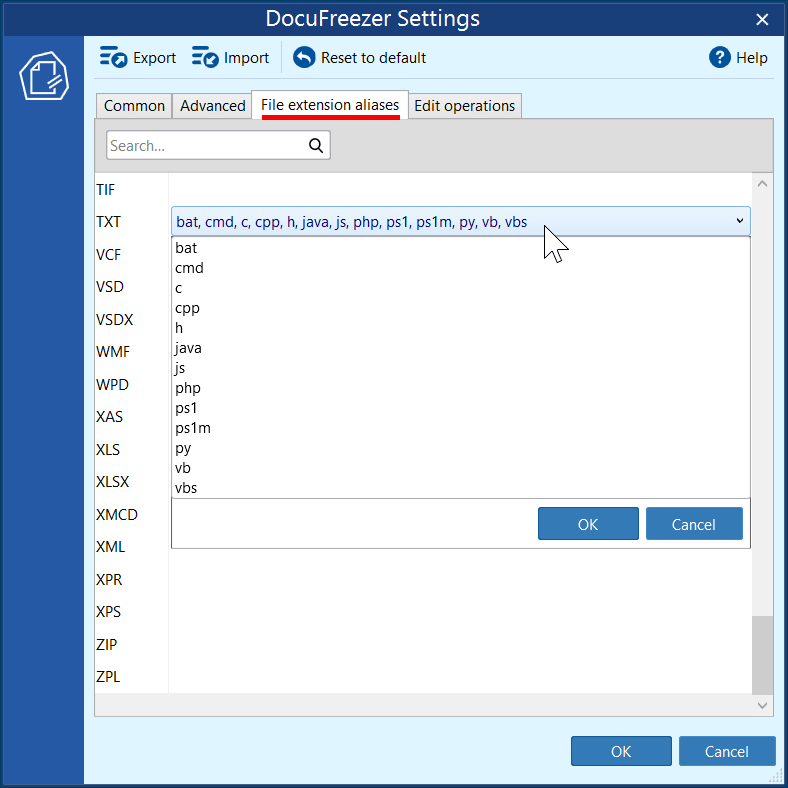
The default TXT aliases include BAT, CMD, C, CPP, H, JAVA, JS, PHP, PS1, PS1M, PY, VB, and VBS. These are treated as text input for conversion. Use the plain-text input settings to control their font, page layout, and character encoding.
Convert one file to check the alias. If DocuFreezer recognizes it but conversion fails, check that the file opens correctly and that any required software is installed.
Additional reference: File extension aliases.
Edit operations
Edit operations change visible page content, dimensions, or orientation during conversion.
Add, order, and remove operations
Open Settings → Edit operations, then build the operation list:
- Click Add new and choose the operation.
- Open its settings, enter the required values, and click OK.
- Add another operation if the same job needs one.
- Select an operation and use Move up or Move Down to change its place in the list. Use Delete to remove it from the configuration.
- Confirm Settings, return to the main window, and click Start.
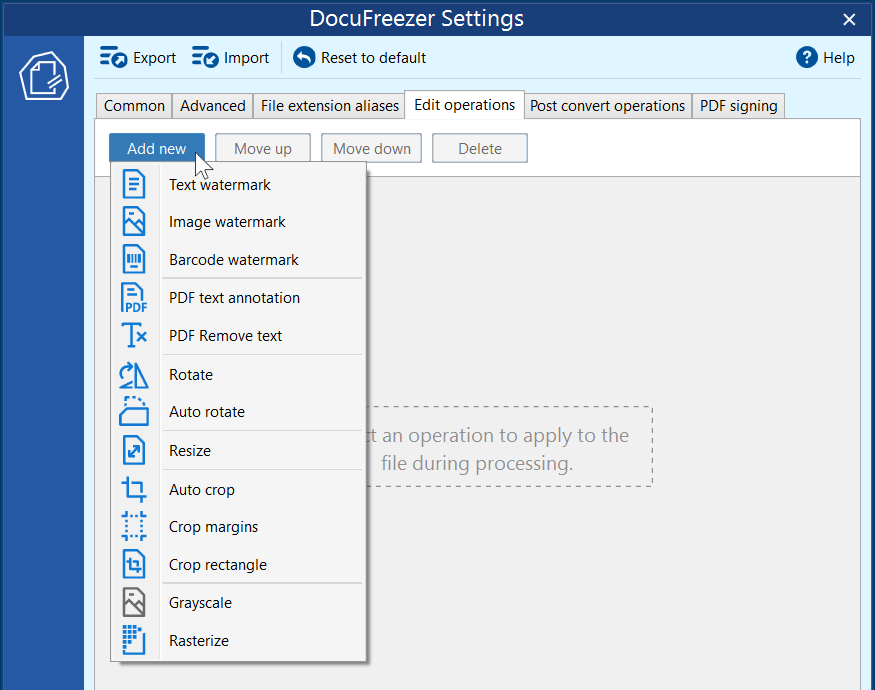
For overlapping watermarks, order and foreground/background placement affect which marks are visible. Review the operation list before reusing a profile: an operation saved earlier can still be part of the current configuration.
Choose the operation’s pages
If the operation has a Page range control, choose Apply to all pages or Apply to a page range. For a range, enter values such as 1,3,5-10. Watermarks also support last for pages counted from the end, and Page range selection for odd or even pages.
For example, a text watermark restricted to page 1 should appear on the first page while the other converted pages remain unmarked by that operation. Check a page inside the range and one outside it. The job’s main Page range must still include the pages you intend to convert.
Additional reference: Edit operations reference.
Text, image, barcode, and annotation
Choose Text watermark for words or dynamic values, Image watermark for an existing graphic, or Barcode watermark for encoded data. For text added to PDF output, PDF text annotation provides another option. Decide the content, placement, and pages before adjusting the appearance.
Text watermark
Choose Add new → Text watermark. Replace the default page-number macro {SrcFilePageNo} with your own text, or combine text and macros. Enter can create additional lines. The default placement is the lower-right corner.
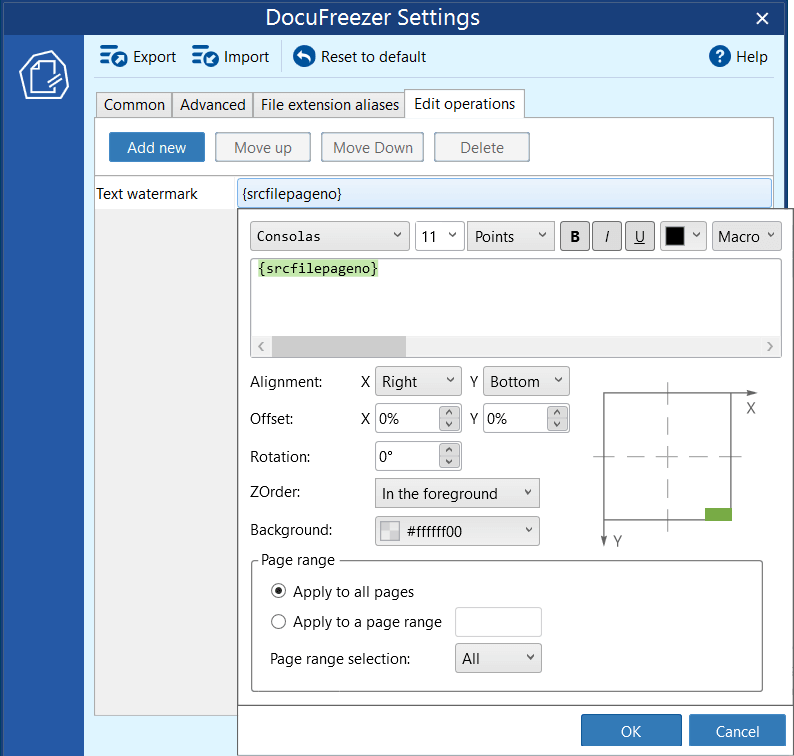
| Control or setting | What it does |
|---|---|
| Font controls | Set typeface, size, bold, italic, underline, and text color. |
| Macro | Insert source-file data, page numbers, dates, or other supported values. |
| Alignment | Choose horizontal and vertical positioning, such as Center / Center or Right / Bottom. |
| Offset | Move the mark along the X and Y axes. Values are percentages of the page dimensions and may be positive or negative. |
| Rotation | Rotate the watermark by the specified angle. |
| Z-Order | Place the mark in the foreground or background of the document contents. |
| Background | Choose the text background fill, including a transparent fill. |
| Page range | Apply the mark to all pages or a selected range; optionally restrict it to odd or even pages. |
PDF text annotation
PDF text annotation adds text over PDF pages without re-rendering them. It offers the same kinds of text and placement controls as Text watermark.
Image watermark
Choose Image watermark and select your watermark file: JPG, PNG, HTML, or PDF. Adjust its alignment, offset, rotation, and foreground/background position.
Set opacity controls transparency. Watermark size can keep the source size or use a percentage of the document size. Embed image stores the chosen watermark image in the program’s installation folder for reuse. Confirm the file is available before processing; a missing image can produce an error.
Barcode watermark
Choose Barcode watermark, then select its Type. You can choose QR Code, EAN, UPC, CODE 128, Data Matrix, and other supported types. Enter the value to encode in Text, then use Preview to inspect the code.
For a QR code, choose QR CODE and check the preview with a scanner. After setting its size, position, and rotation, scan the converted result too: final size and background can affect readability.
Page numbers and Bates numbers
{SrcFilePageNo} uses the page position within the source file. Bates numbering provides a sequence across documents. For a label containing the uppercase source name and a six-digit Bates number, use:
{SrcFileName(upper)} {BatesI(D6)}Bates number in Advanced settings stores the next starting number and can be changed before a run. Check it when starting a new sequence or continuing an existing one. {*Bates1}, {*BatesI}, and {*BatesN} represent a file’s first, current, and last Bates page numbers.
To include a file’s Bates range in its output name, use:
[{*SrcFilename(upper)} {*Bates1}-{*BatesN}] {*SrcFilename}.{*DstFileExt}Inspect marks on dense pages and on different page sizes and orientations. Check placement and opacity, plus the first and last Bates labels and the next starting value.
Additional reference: Watermark controls and macros.
Additional reference: Bates numbering.
Page transformations
Use a sample with fine detail and content near the edges to evaluate page operations.
Rotate and Auto rotate
Rotate applies a specified clockwise or counterclockwise rotation. Arbitrary angles are supported for raster images; use right-angle rotations for document types such as PDF. Auto rotate instead chooses an orientation: As in document, Portrait, or Landscape.
Resize
Enter Width, Height, and Units. Units can be pixels, millimeters, centimeters, inches, or percent. Then select the appropriate fitting mode: Fit, Fill, Thumbnail, or Stretch. A fit mode determines how the original proportions relate to the target dimensions.
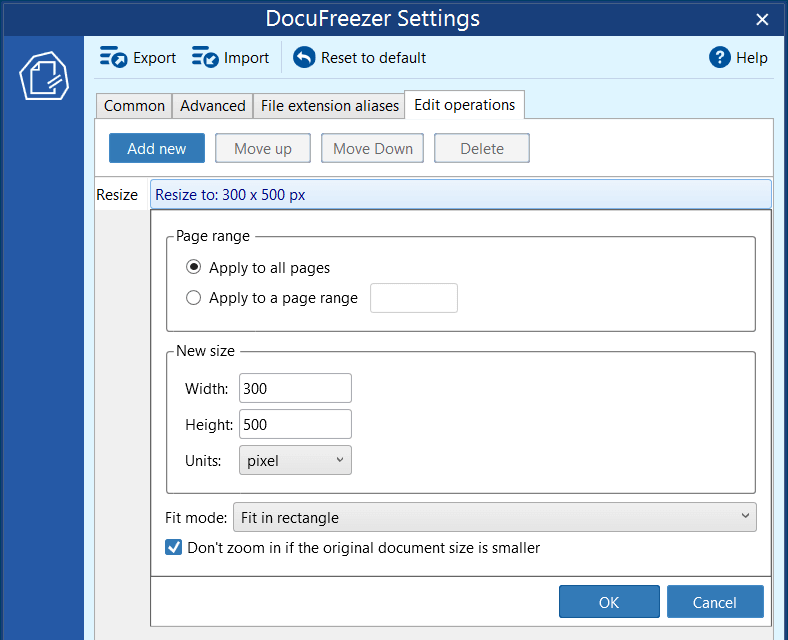
Select Don’t zoom in if the original document size is smaller when you want small originals to keep their size. For a Letter-size result, enter 215.9 × 279.4 mm and choose the fitting mode that suits your page.
Auto crop
Removes detected blank white margins. Tolerance controls how strictly the program interprets white. A higher tolerance allows more variation in the margin color. Check a page with faint content near its edges before applying an aggressive tolerance to a batch.
Crop margins
Enter the amounts to remove from Left, Right, Top, and Bottom. This is useful when unwanted margins have a known, consistent size. Use the operation’s page range if only part of the document needs the crop.
Crop rectangle
Define the retained rectangle with Width and Height, then locate it with Left and Top. Unlike margin cropping, this describes the area to keep by its size and position.
Grayscale
Select 256 shades of gray to remove color while keeping tonal detail, or Black and white for two-color output. Optional dithering approximates gray shades using black-and-white pixel patterns.
After rotation, check that the text reads the right way up. After resizing, check page dimensions and whether images look stretched. After cropping, compare the edges with the original to make sure you kept everything you need. For grayscale output, check that charts, shaded cells, and fine text are still clear.
If you’ve added several operations, check their combined effect on pages of different sizes. If only some pages changed, review each operation’s page range.
Rasterization
The Rasterization edit operation turns page content into a raster image. Use it when you need the page represented as pixels. It is separate from the Rasterization resolution setting, which sets image detail.
Add Rasterization from Add new in Edit operations. Convert a sample and inspect small text and thin lines at the size you plan to use. If you also need searchable PDF text, check the final file’s search behavior and review OCR.
Further reading: All edit operations and their settings.
Post-convert operations
Open Settings and select Post-convert operations to access operations performed after conversion. Review this tab when a saved configuration includes additional actions at the end of a job.
For copying, moving, or deleting original files according to whether they were processed successfully, see Post processing. Check the job status as well as the output when using actions that run after conversion.
Save profiles and apply item settings
An INI profile saves how documents are processed; an FLIST saves which files to process. Save both to repeat the same inputs and configuration. Item settings... let selected documents use different profiles within one batch.
Save and restore a configuration
Once a sample job produces the required result, use Export in the Settings toolbar and give the INI file a descriptive name. Use Import to reuse it; profiles from older versions are also supported.
Export a configuration before resetting or replacing it. After importing a profile, check its output folder and operation list before starting the next job.
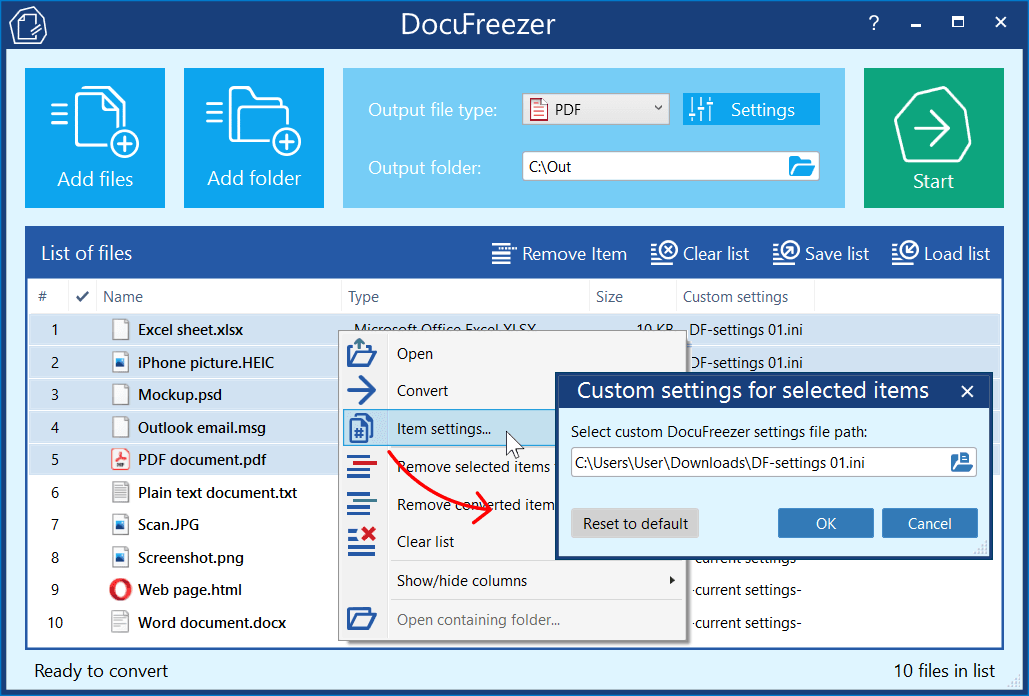
Give selected files their own profile
- Configure the settings for the first group and export them to an INI file.
- Return to the List of files. Right-click and enable Show/hide columns → Custom settings.
- Select the target rows with
CtrlorShift. - Right-click the selection and choose Item settings....
- Select the saved INI profile and click OK.
- Check the Custom settings column to confirm the profile is assigned to the intended rows.
Repeat with another profile for another group, for example to use different watermark text. Changing general Settings does not replace profiles already assigned to rows.
When exporting a second watermark profile, first remove or replace the first watermark operation if it should not be included. Otherwise both operations can become part of the second saved configuration.
Try one file from each profile group. Check the differences you set up, such as watermark text, and shared choices such as the output folder.
Run and check the job
Before clicking Start
Check the list, its order, the output format, and the destination. Review any item-specific profiles. In Settings, confirm the page range, attachment rule, Edit operations, and any Post-convert operations. If you are combining files, also confirm the combined filename and the action for an existing combined file.
During conversion
Click Start in the main window. DocuFreezer processes the list and normally displays per-file progress. Processing speed depends on source complexity, page count, OCR, rasterization resolution, and the conversion components required by the formats.
DocuFreezer moves on when a file reaches its timeout. Check the status of each item: finishing the batch doesn’t mean every file converted successfully.
Inspect the output
- Review the completion information and any errors in the list.
- Open the selected output folder, including recreated subfolders if Restore subfolders is enabled.
- Check representative files using the relevant settings sections linked below.
If the list offers to remove completed entries, clear them or keep them for another run. Review the settings for existing output files before repeating a job.
| What you configured | Checks in this guide |
|---|---|
| Page range, split, or merge | Check file and page counts against Multipage, and the joins and bookmarks when adding pages to a PDF. |
| Attachments | Compare the message and attachment list using the attachment checks. |
| OCR | Use the recognition checks to verify search and text accuracy. |
| Watermarks or page operations | Check page scope, marks and numbering, and page size, rotation, and cropping. |
| Naming and folder rules | Inspect saved filenames and the destination and subfolders. |
| Source-file actions | Verify the success/failure actions as described under Post processing. |
When the result differs from what you expected
| What you see | What to check |
|---|---|
| Too many output files | Check the selected format, Multipage, Split worksheets, and the Separate attachment setting. |
| Missing pages or content | Check Page range, blank-page removal, worksheet selection, crop operations, and attachment masks. |
| Unexpected page size or orientation | Check the input-format page settings, Resize, Auto rotate, and PDF page creation controls. |
| Text cannot be searched | For image sources, enable OCR. For searchable PDF output, keep Flatten PDF (non-searchable text) disabled. |
| “Created by trial version of DocuFreezer” watermark | This watermark is added by the trial version. To convert files without it, purchase and install the full commercial version, then convert the source files again. |
| An old watermark is still present | Review Edit operations and any item-specific INI profile. Distinguish source-document marks and the trial watermark from a configured operation. |
| A file exists despite an error | Review Keep output files on any error and inspect the log before using that output. |
| A format fails while other files succeed | Check its required software and source passwords, then collect the log for the failing file. |
To narrow down a problem, try the affected file on its own and change one setting at a time. Export your original settings first so you can return to them.
Help and reference
Check required software before converting a new file type. If you need help with a failed job, the steps below show you how to collect the version, settings, and log for Support.
About, updates, logs, and support
Find the installed version
Click the ? at the top right of the main window, or open About… from the logo menu. The About window shows the installed version. The commercial version also shows the Serial Number.
To check for an update immediately, click the upper-left logo and choose Check for updates…. Automatic checking is controlled by the Check for updates setting under On program start.
Export diagnostic information
- Reproduce the problem so that the recent log contains the relevant activity.
- Click the upper-left logo and choose Export log files….
- Keep Add DocuFreezer Settings to the exported file selected so the archive includes the current INI configuration.
- Click Export and save the ZIP file.
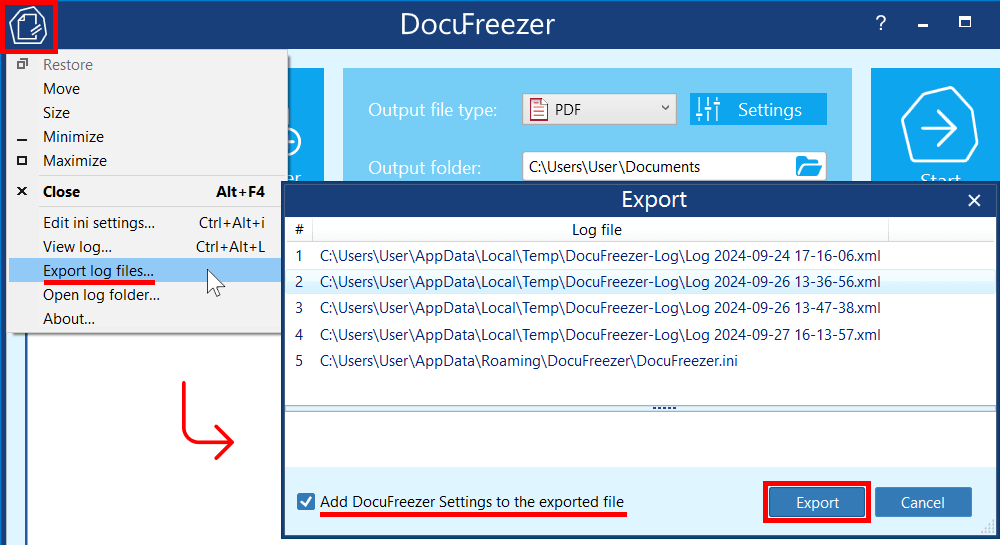
To open the logs directly, choose Open log folder… from the application menu. You can also enter %TEMP%\DocuFreezer-Log in File Explorer if you haven’t changed the log location.
Log settings
Open Settings → Advanced → Application → Logging to configure the following options.
| Control or setting | What it does |
|---|---|
| Verbosity level | Default: Verbose. Other levels are Regular, Laconic, and Trace. |
| Create new log file after | Default: File size limit exceeds. The alternative is Every day. |
| File size limit | Default: 16 MB. |
| Keep log history | Default: 8 files. |
| Log file folder | Default base location: %TEMP%. Can be changed in Advanced settings. |
Contact Support
Use the Support page. Describe the expected result and what actually happened. Include the installed version, the source and output formats, the exported diagnostic ZIP, and a sample file when it can be shared. Mention whether the same file fails with default settings or only with a particular profile.
You’ll find more examples in the Knowledge Base. If you still need help, send Support the diagnostic information described above.
Additional reference: Locating and exporting logs.
Supported formats and required software
Locate the source extension below. Install any required component before testing a new file type.
Formats with built-in processing
| Format family | Extensions |
|---|---|
| Documents and text | DOC, DOCX, RTF; TXT, TEXT, JAVA; PDF and PDF Portfolio; XPS, OXPS; EPUB. |
| Images and graphics | BMP, DIB; DCX; DCM, DIC; EMF; GIF; JPG, JPEG, JFIF, JBIG, JBG; PNG; PSD; TIF, TIFF; WEBP; WMF; SWF. |
| Spreadsheets | XLS, XLSX. Other spreadsheet types can have different software requirements. |
| Drawings and printer data | DWG, DXF; HP, HPG, HPGL; ZPL. Rendering options depend on the type. |
| Emails and contacts | EML, MSG, EMLX, PST, OST, P7M, VCF. |
| Web pages and archives | HTM, HTML, MHT, MHTML; ZIP, RAR, 7Z; CBR, CBZ. |
Formats that need additional software
| Source format | Required component |
|---|---|
| HEIC, HEIF | ImageMagick or the required HEIF/HEVC codecs; see the HEIC and HEIF input. |
| CDR, CGM | CorelDraw. |
| CSV | Microsoft Excel or Apache OpenOffice for document conversion. Importing a CSV list of file paths is a separate workflow. |
| DOT, DOTX, DOCM; PPT, PPTX, PPS, PPSX; XLSM, XLSB | Microsoft Office 2007 SP2 or newer, Apache OpenOffice, or LibreOffice, according to the supported-format requirements. |
| ODT, ODS, ODP, ODG, ODF | Apache OpenOffice or LibreOffice. |
| DFT | Solid Edge. |
| KDW, CDW, SPW | KOMPAS-3D. |
| MCDX, MCTX | Mathcad Prime. |
| VSD, VSDX | Microsoft Visio 2010 or newer. |
| MPP | Microsoft Project 2010 or newer. |
| ICS | Microsoft Outlook. |
| LWP | Apache OpenOffice. |
| PS, EPS | Ghostscript. |
| SVG | Apache OpenOffice. |
| PCX, TGA, XML | Microsoft Office 2007 SP2 or newer, Apache OpenOffice, or LibreOffice, according to the supported-format requirements. |
| PUB | Microsoft Office 2007 SP2 or newer, Apache OpenOffice, LibreOffice, or WordPad, according to the supported-format requirements. |
| WPC, WPD | Microsoft Office 2007 SP2 or newer. |
| SolidWorks and related engineering formats | SolidWorks 2021 or newer. Supported extensions include SLDDRW, EPRT, EPRTX, EASM, EASMX, EDRW, EDRWX, SLDPRT, SLDASM, PRTDOT, ASMDOT, DRWDOT, 3DXML, STL, CALS, PRT, XPR, ASM, and XAS. |
PDF processing can also use Acrobat or Acrobat Reader when an external engine is selected. If DocuFreezer recognizes your file but can’t convert it, use the troubleshooting checks.
Additional reference: Full list of supported formats and required software.